Key takeaways
- TE3 supports DAX UDFs today: Tabular Editor 3.23.1 and higher have full, day-0 support for DAX User-Defined Functions.
- Start with compatibility level 1702: Create or upgrade your model to compatibility level 1702, available in Power BI Desktop and the Power BI/Fabric Service.
- Create and write functions in the editor: Make a function, start from an empty Expression Editor, and use Code Actions to help write your DAX UDFs.
- Use UDFs in measures: Once defined, call your UDF from a measure, with a community DAX Lib emerging to share functions.
This summary is produced by the author, and not by AI.
Tabular Editor 3 has full support for DAX User-Defined Functions (UDFs) built in right now. With the Tabular Editor version 3.23.1 or higher, we have worked hard to ensure that you have the best experience possible when writing and using UDFs. To get you started, here is a small guide on the first five steps of writing a UDF in Tabular Editor 3.
NOTE
Tabular Editor 3 includes day 0 support for both new semantic model objects introduced at FabCon Europe 2025: DAX User-Defined Functions and Custom Calendars. It is important to underline that this blog isn't an attempt to teach you how UDFs work, but we will soon release a course on our learning platform that will give you all those details. So stay tuned.
Step 1: New compatibility level – 1702
The first thing to do is to create a new model or upgrade your current model to compatibility level 1702. If UDFs don’t show up as an option in the TOM Explorer you don’t have the correct compatibility level set.
NOTE
Compatibility Level is the TOM object term for enabling release-specific behaviors in the Analysis Service engine. For more information refer to Microsoft documentation on compatibility levels. UDFs are currently only available in Power BI Desktop and the Power BI/Fabric Service. Compatibility level 1702 isn't available on SSAS and Azure AS.
Additionally, compatibility level 1701 and higher also includes support for custom calendars. Check back soon for an article on these.
You update the compatibility level on an existing model by going to the TOM Explorer, selecting the top model object and under its properties locating the Compatibility level.
Here is a small example of how that would look:
Step 2: Create a function
As we saw in the previous section, UDFs introduce a new folder inside the TOM Explorer called Functions. This is where you create and store all the model’s functions. To create a new function, you can either:
- Go to the Model menu and select “Add User-Defined Function” or
- Right-click in the TOM Explorer on functions and choose Create -> User-Defined Function.
Step 3: Start from an empty Expression Editor
It’s very simple to make the function, but just like measures, you need to fill it with DAX and business logic for it to be valuable.
Now on to write some DAX into that empty Expression Editor or? Well, not quite first we need to learn a little new syntax that is required when creating functions:
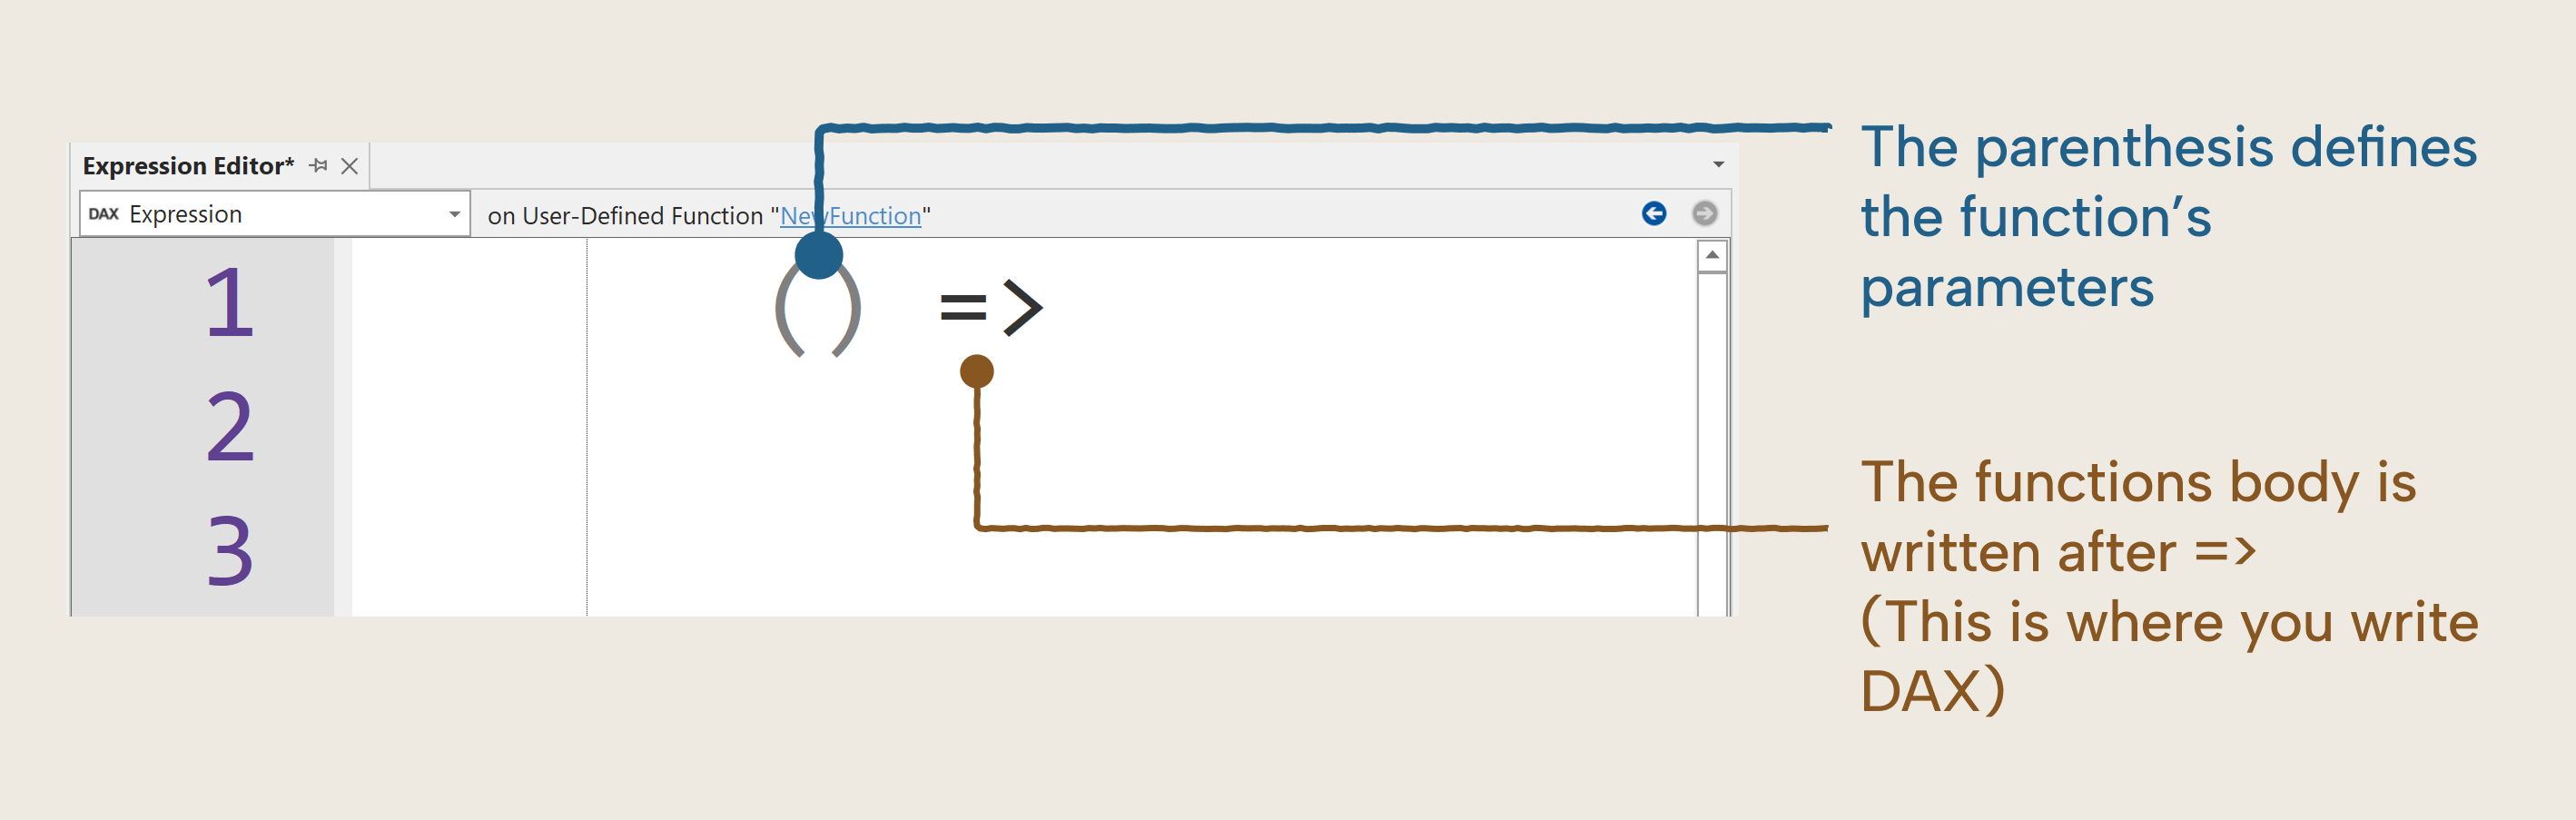
This syntax is required for a function definition. Luckily, you don’t have to remember this by yourself, as Tabular Editor contains a nifty code action that inserts the syntax for you so it is as simple as one click to get started writing your first function.

Step 4: Write DAX UDFs
The function is there, the code action has given us a quick start on the UDF syntax, where do we go from here? A good place to start is to look through your model and identify a DAX pattern that you reuse across several measures.
Here is an example of a measure that calculates a comparison related to a specific target measure. Here, the Orders Target is used to calculate the delta with the [Net Orders], and then a percentage difference calculation is done.
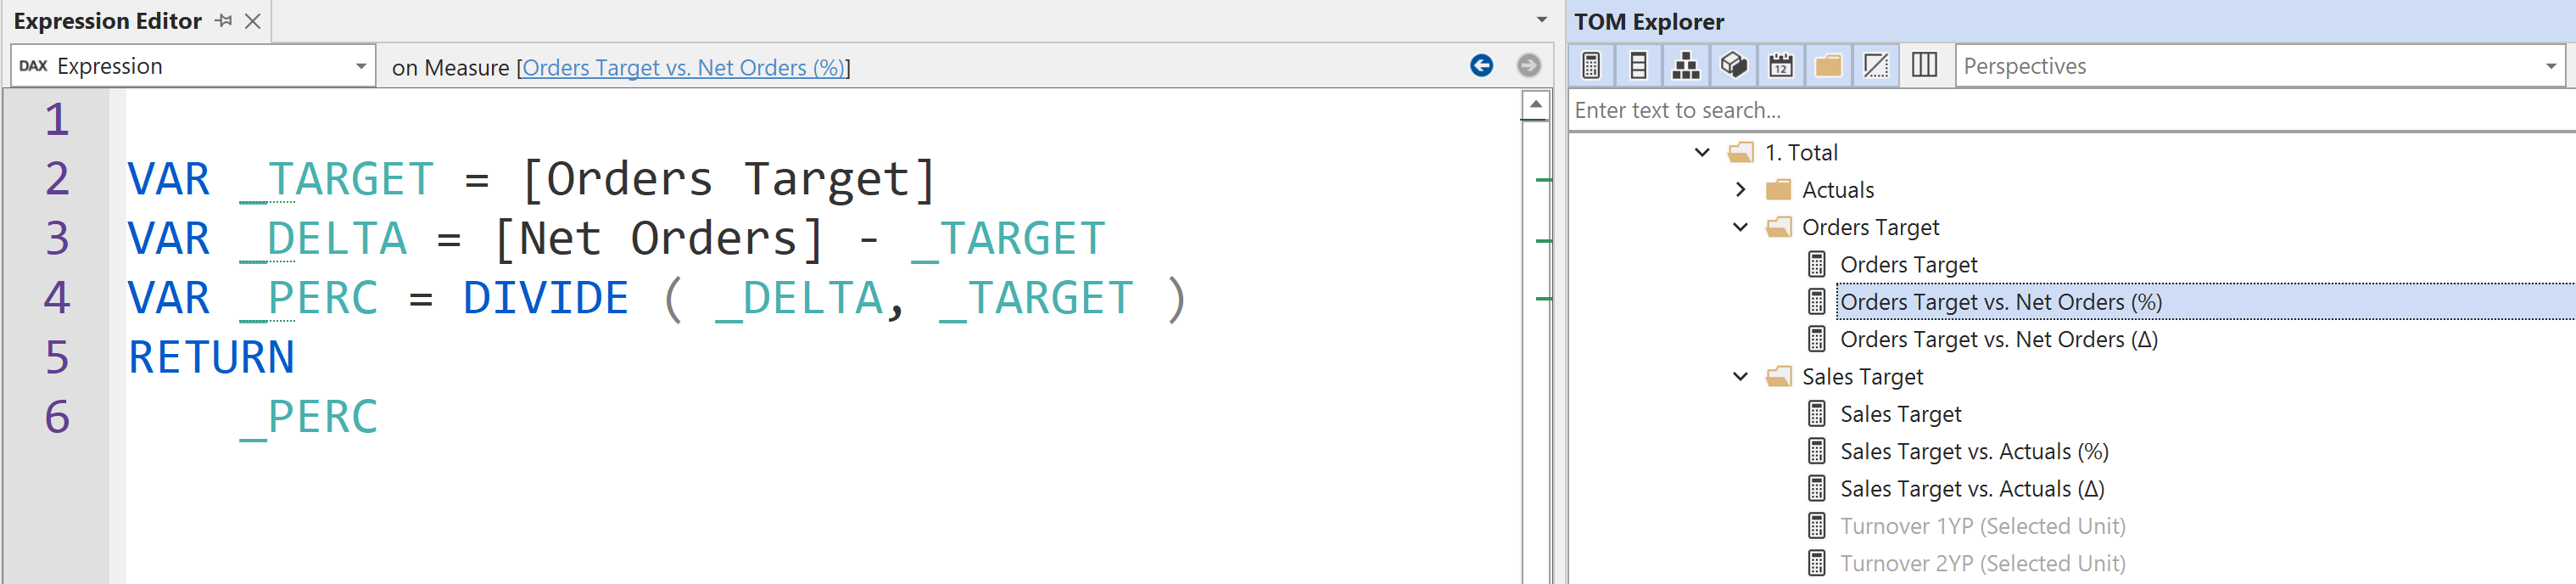
This pattern is used several times in the model. It is thus a prime candidate to use a function instead in order to centralize your business logic, making it easy to reuse and maintain across your model.
In the following demo, we create a function that can replace the code in the measure with our new function.
One thing to do before writing DAX is to give your new function a meaningful name. Giving your function a good name is the first step to you and others knowing how to use it. In this case, we will call it Comparison.RelativeToTarget.

TIP
Creating a naming standard for your functions will help with maintenance throughout your development process. One current best practice is to use a [Area].[SubArea].[FunctionName] naming standard.
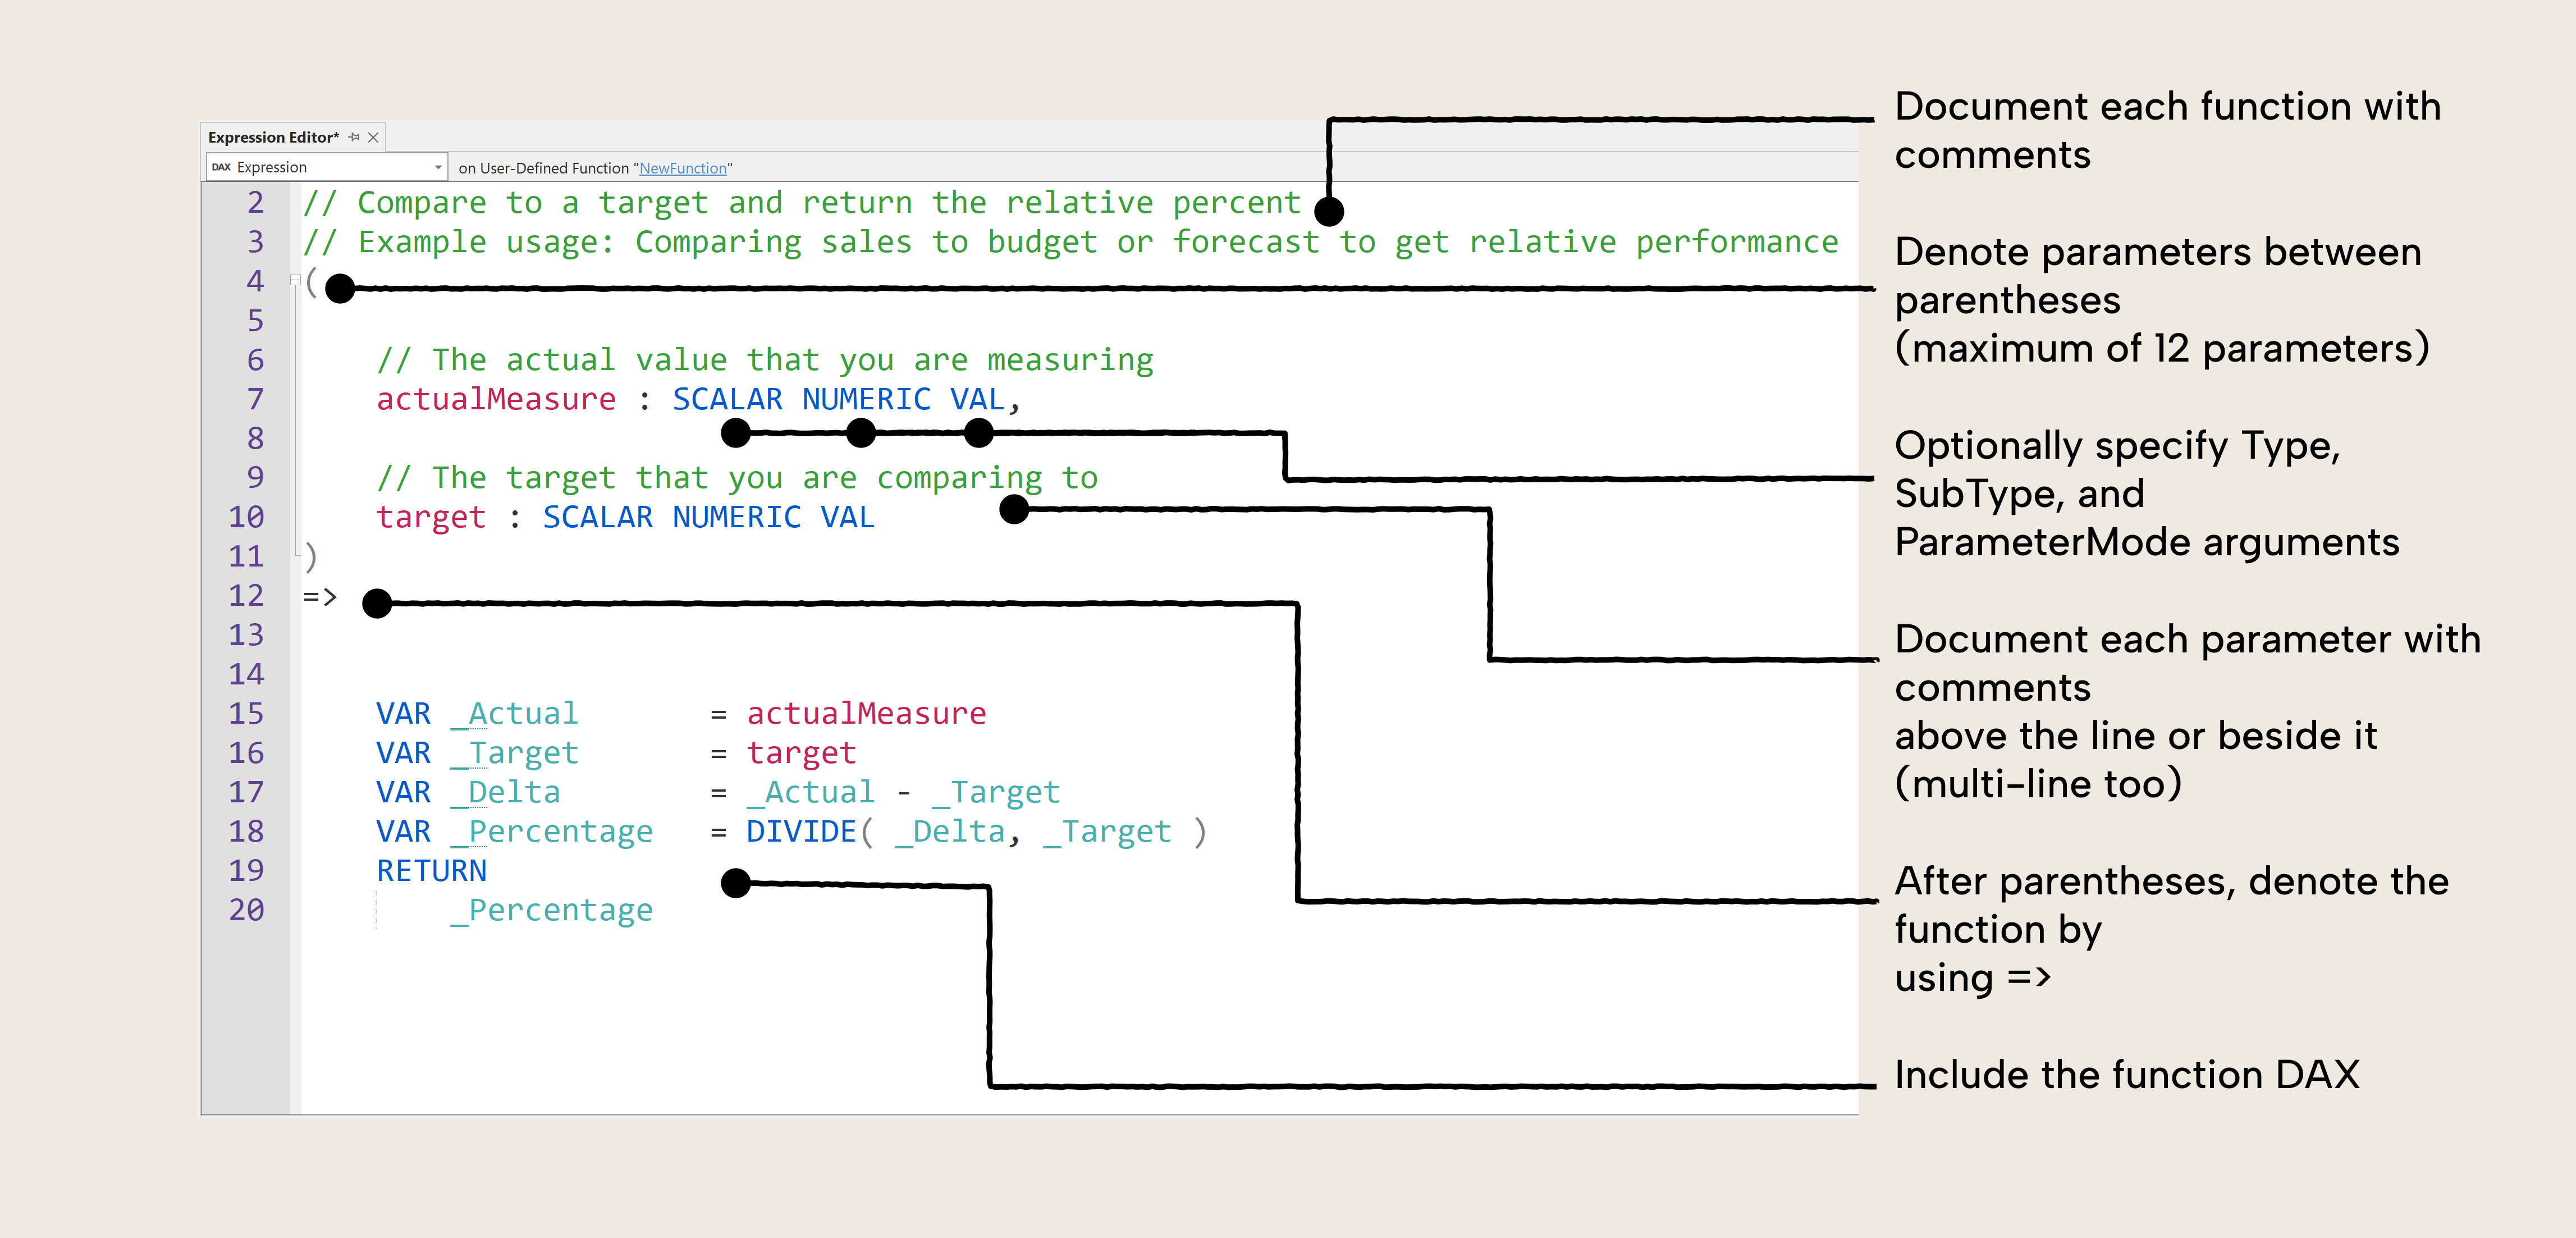
The syntax of the [Comparison.RelativeToTarget] is described in the figure below. Tabular Editor 3 uses the comments you make for your functions and parameters to populate the tooltips when you use the function elsewhere. We will see this in action in the next step.
Step 5: Use a UDF in a measure
Now, let's see how we can use the function we just wrote within a measure to replace the logic. We’ll locate the measure from the previous step and see how our function can simplify the measure’s logic and be reused across other measures as well.
As you can see in the demo above, the DAX expression of the original measure can be simplified with the new comparison function we created. And while you're writing your functions, Tabular Editor’s code assistance guides you along and uses the comments of the functions and parameters in the call tips that are available to the user, making it easy to understand what the function is for and what to use in the parameters.
UDF code example
If you want to try out how to set up this function yourself we have included the code for it here:
// Compare to a target and return the relative percent
// Example usage: Comparing sales to budget or forecast to get relative performance
// Examples:
// - 9/10  is -10% or -1
// - 11/10 is +10% or +1
(
    // The actual value that you are measuring
    actualMeasure : SCALAR NUMERIC VAL,

    // The target that you are comparing to
    target : SCALAR NUMERIC VAL
)

=>
    VAR _Actual       = actualMeasure
    VAR _Target       = target
    VAR _Delta        = _Actual - _Target
    VAR _Percentage   = DIVIDE ( _Delta, _Target )
    RETURN
        _Percentage
DAX Lib
The community is bringing together a library of DAX UDFs that you can use as templates. Find them at daxlib.org. It's all free and available for you to get started right away with adding functions to your semantic model.
For further reading
- Introductory primer (Tabular Editor). A conceptual primer on what DAX UDFs are and why they matter, the right starting point before working through the steps in this article.
- Writing tips (Tabular Editor). Practical advice on naming, typing, and structuring UDFs, directly applicable after writing your first function as shown here.
- Official overview (Microsoft Learn). Microsoft's official overview of UDFs in Power BI Desktop, covering the DAX query view and TMDL view authoring paths alongside Tabular Editor.
- Best practices reference (Microsoft Learn). The official best practices guide for UDF syntax, parameter types, and usage patterns, a reference to keep open while writing your first functions.
In conclusion
Tabular Editor 3 is a one-stop IDE for building User Defined Functions into your semantic model, and provides assistance on how to get started and get the syntax right the first time around, as well as helping you document how to use your functions inside your measures without having to refer back to their definition.
Create, review, and reuse DAX UDFs in Tabular Editor 3.
Give Tabular Editor a spin