
此内容由人工智能翻译,尚未经过人工编辑审核。图像和图表保持其原始语言。
上周,我们的 CTO Daniel Otykier 又一次参与了 Twitter 上的一场讨论;Micah Dail 在其中建议写一个脚本,用人类可读的信息来注释角色成员,而不是那些人类根本看不懂的 AAD GUID。
|
我有个很棒的脚本想法,但一直没能写完,而且网上也找不到类似的内容。 |
下面就是我们为此编写的脚本。
它的目的是帮助你记录模型中安全角色的成员信息。
因此,除了像下面这样奇怪的对象或应用引用之外,你还会为每个成员获得一条人类可读的注释说明:
很遗憾,这个脚本并不是那种“运行一次就不用管”的工具,因为它需要一些权限,才能在代码中查询 Microsoft Graph。
因此,请按第 1 步到第 5 步的说明操作(如果你只打算运行一次脚本,也可以在第 2 步后停止)。
第 1 步:在 Azure AD 应用中配置 Microsoft Graph 权限
要通过代码查询 Microsoft Graph,我们需要一个带有特定权限集的 Azure AD 应用。
这是因为代码会以当前登录用户的身份执行;当你运行脚本时,它会获得代表你执行所需操作的权限。
所需权限如下:
- Microsoft Graph (委派权限)
- Application.Read.All
- Group.Read.All
- User.Read
- User.ReadBasic.All
这一步你有两个选择:
选项 1:使用 Tabular Editor 提供的 Azure AD 应用
为方便使用,我们在自己的租户中创建了一个多租户应用,你可以直接使用。
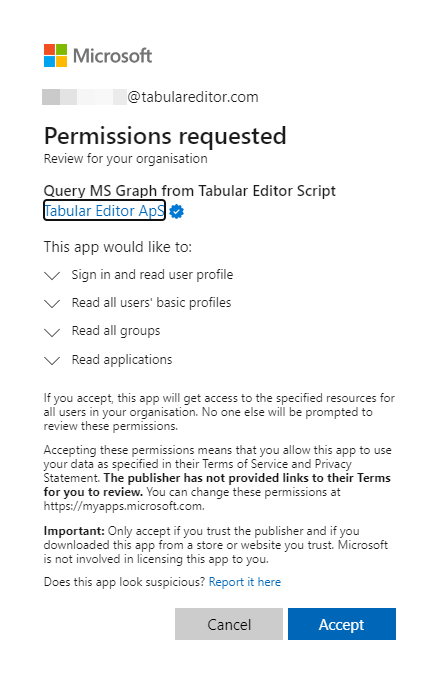
它会请求正确的 API 权限;你只需要让 IT 同事同意在你的 Azure 租户中使用该应用即可。
为了方便他们操作,你可以直接把这篇博客的链接发给他们,并让他们访问这个链接:login.microsoftonline.com
这会弹出下面的对话框,他们可以在你的租户中批准该应用:
注意
|
选项 2:创建你自己的 Azure AD 应用
你可以前往 Azure Portal,并在其中访问 Azure Active Directory 来创建自己的应用。
由于大多数公司都会有一些限制,你很可能需要 IT 同事协助完成。
创建应用的流程在这里:快速入门:注册应用 (可跳过“重定向 URI”和“凭据”相关章节)。
应用创建完成后,需要为其分配 API 权限,说明见:为 Microsoft Graph 配置委派权限。
所需权限如下:
- Microsoft Graph (委派权限)
- Application.Read.All
- Group.Read.All
- User.Read
- User.ReadBasic.All
创建完成后,你需要获取 Client (Application) Id,用它替换脚本中的 clientId。
第 1.1 步:测试与 Microsoft Graph 的连接
无论你选择选项 1 还是选项 2,都请先验证应用是否配置正确,以及是否已授予必要的同意。
下面这段短脚本要么会告诉你可以继续,要么会提示你需要修复哪些内容:
#r "Azure.Identity"

using Azure.Identity;

var clientId = "a57d5fb7-7eb6-422d-9c83-5347a7a9194c";  // Replace with your applications clientId if you use your own app.

try
{
	var options = new DefaultAzureCredentialOptions
	{
		ExcludeAzureCliCredential = true,
		ExcludeAzurePowerShellCredential = true,
		ExcludeEnvironmentCredential = true,
		ExcludeInteractiveBrowserCredential = false,
		ExcludeManagedIdentityCredential = true,
		ExcludeSharedTokenCacheCredential = true,
		ExcludeVisualStudioCodeCredential = true,
		ExcludeVisualStudioCredential = true,
		InteractiveBrowserCredentialClientId = clientId
	};
	var credential = new DefaultAzureCredential(options);
	var tokenRequest = credential.GetTokenAsync(
		new Azure.Core.TokenRequestContext(
			new[] { "https://graph.microsoft.com/Application.Read.All", "https://graph.microsoft.com/Group.Read.All", "https://graph.microsoft.com/User.ReadBasic.All" }
			));
	var token = await tokenRequest.ConfigureAwait(false);
	var accessToken = token.Token;

	Info("Your Azure AD App is configured correctly and you can proceed");
}
catch (Exception ex)
{
	Error("There was an error while validating your Azure AD App.\r\nPlease validate all its settings and try again.\r\n\r\nException was:\r\n" + ex.Message);
}
第 2 步:在 Tabular Editor 中新建一个 C# Script,并复制/粘贴脚本
现在你已经准备好开始使用实际脚本了。 你可以直接运行它,也可以将其保存为宏,下一步会介绍。
脚本会遍历:若你选中了角色,则处理所有选中的角色;否则处理模型中的所有角色。然后遍历这些角色的所有成员,并尝试用对象类型(Service Principal、组或用户)和 DisplayName 为其添加注释。
你可以使用右上角的按钮复制下面的脚本,然后粘贴到 Tabular Editor 3 中新建的 C# Script 里。
#r "Azure.Identity"
using Azure.Identity;
using System.Threading.Tasks;
using System.Net.Http.Headers;
using System.Net.Http;
using Newtonsoft.Json.Linq;
using System.Text.RegularExpressions;
// We need an Azure AD App to be able to connect to Microsoft Graph.
// You can either stick with this one, which is created in the Tabular Editor tenant as a multi tenant app,
// or you can create your own in your tenant,。 需要以下 API 权限:
// Microsoft Graph:
// Application.Read.All
// Group.Read.All
// User.Read
// User.ReadBasic.All
var clientId = "a57d5fb7-7eb6-422d-9c83-5347a7a9194c";
// What do you want the annotation name to be?
var annotationName = "MemberDescription";
// You probably shouldn't edit anything below this line...
class MicrosoftGraphHelper
{
HttpClient client;
string _clientId;
public MicrosoftGraphHelper(string clientId)
{
_clientId = clientId;
}
private async Task AuthenticateAsync()
{
// If not already authenticate, get a token by using interactive authentication
if (client == null)
{
var options = new DefaultAzureCredentialOptions
{
ExcludeAzureCliCredential = true,
ExcludeAzurePowerShellCredential = true,
ExcludeEnvironmentCredential = true,
ExcludeInteractiveBrowserCredential = false,
ExcludeManagedIdentityCredential = true,
ExcludeSharedTokenCacheCredential = true,
ExcludeVisualStudioCodeCredential = true,
ExcludeVisualStudioCredential = true,
InteractiveBrowserCredentialClientId = _clientId
};
var credential = new DefaultAzureCredential(options);
var tokenRequest = credential.GetTokenAsync(
new Azure.Core.TokenRequestContext(
new[] { "https://graph.microsoft.com/.default" }));
var token = await tokenRequest.ConfigureAwait(false);
var accessToken = token.Token;
// Append token to httpclient to be able to call the Microsoft Graph API
client = new HttpClient();
client.DefaultRequestHeaders.Authorization = new AuthenticationHeaderValue("Bearer", accessToken);
client.DefaultRequestHeaders.Accept.Add( new MediaTypeWithQualityHeaderValue("application/json"));
}
}
private async Task<HttpResponseMessage> CallRestApiAsync(string url)
{
// Helper function for invoking REST API
await AuthenticateAsync();
return await client.GetAsync(url).ConfigureAwait(false);
}
public async Task<JObject> GetAADUserAsync(string objectId)
{
var url = $"https://graph.microsoft.com/v1.0/users/{objectId}";
var response = await CallRestApiAsync(url).ConfigureAwait(false);
var jsonResult = await response.Content.ReadAsStringAsync().ConfigureAwait(false);
return JObject.Parse(jsonResult);
}
public async Task<JObject> GetAADGroupAsync(string objectId)
{
var url = $"https://graph.microsoft.com/v1.0/groups/{objectId}";
var response = await CallRestApiAsync(url).ConfigureAwait(false);
var jsonResult = await response.Content.ReadAsStringAsync().ConfigureAwait(false);
return JObject.Parse(jsonResult);
}
public async Task<JObject> GetAADApplicationAsync(string objectId)
{
var url = $"https://graph.microsoft.com/v1.0/applications/{objectId}";
var response = await CallRestApiAsync(url).ConfigureAwait(false);
var jsonResult = await response.Content.ReadAsStringAsync().ConfigureAwait(false);
return JObject.Parse(jsonResult);
}
public async Task AnnotateRoleMembersAsync(string annotationName)
{
if (ScriptHost.Model.Roles.Count == 0)
{
Info("Your model doesn't contain any roles");
return;
}
if (!ScriptHost.Model.Roles.Any(r => r.Members.Count > 0))
{
Info("None of your roles contains members");
return;
}
if (!ScriptHost.Model.Roles.Any(r => !r.Members.Any(m => m.HasAnnotation(annotationName))))
{
Info("All of your role members are already annotated");
return;
}
// Now we start to work through roles and their members
int roleCount = 0;
int roleMemberCount = 0;
int roleMemberEligableCount = 0;
int roleMemberAnnotatedCount = 0;
var objRegEx = "obj:(?<objId>[0-9a-fA-F]{8}-([0-9a-fA-F]{4}-){3}[0-9a-fA-F]{12})@(?<tenenatId>[0-9a-fA-F]{8}-([0-9a-fA-F]{4}-){3}[0-9a-fA-F]{12})";
var appRegEx = "app:(?<appId>[0-9a-fA-F]{8}-([0-9a-fA-F]{4}-){3}[0-9a-fA-F]{12})@(?<tenenatId>[0-9a-fA-F]{8}-([0-9a-fA-F]{4}-){3}[0-9a-fA-F]{12})";
// If invoked as a macro on one/more role(s), only process those, otherwise process all of models roles
var rolesToProcess = ScriptHost.Selected.Roles.Count != 0 ? ScriptHost.Selected.Roles.ToList() : ScriptHost.Model.Roles.ToList();
foreach (var role in rolesToProcess)
{
roleCount++;
foreach (var member in role.Members)
{
roleMemberCount++;
// Don't attempt to annotate members, that already have the annotation
var existingAnnotation = member.GetAnnotation(annotationName);
if (existingAnnotation == null)
{
roleMemberEligableCount++;
if (member.MemberName.StartsWith("app:"))
{
var appMatch = Regex.Match(member.MemberName, appRegEx);
if (appMatch.Success == true)
{
var appNameObject = await GetAADApplicationAsync(appMatch.Groups["appId"].Value).ConfigureAwait(false);
if (appNameObject.ContainsKey("displayName"))
{
member.SetAnnotation(annotationName, "Azure AD Service Principal: " + appNameObject["displayName"].ToString().Trim());
roleMemberAnnotatedCount++;
}
}
}
else
{
var searchValue = member.MemberName;
var objMatch = Regex.Match(member.MemberName, objRegEx);
if (objMatch.Success == true)
{
searchValue = objMatch.Groups["objId"].Value;
}
var groupNameObject = await GetAADGroupAsync(searchValue).ConfigureAwait(false);
if (groupNameObject.ContainsKey("displayName"))
{
member.SetAnnotation(annotationName, "Azure AD Group: " + groupNameObject["displayName"].ToString().Trim());
roleMemberAnnotatedCount++;
}
else
{
var userNameObject = await GetAADUserAsync(searchValue).ConfigureAwait(false);
if (userNameObject.ContainsKey("displayName"))
{
member.SetAnnotation(annotationName, "Azure AD User: " + userNameObject["displayName"].ToString().Trim());
roleMemberAnnotatedCount++;
}
}
}
}
}
}
// Report result
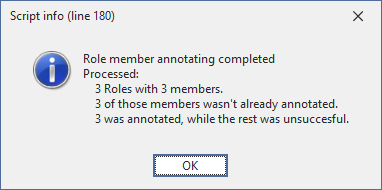
Info(
"Role member annotating completed\r\n" +
"Processed:\r\n" +
$"\t{roleCount} Roles with " + $"{roleMemberCount} members.\r\n" +
$"\t{roleMemberEligableCount} of those members wasn't already annotated.\r\n" +
$"\t{roleMemberAnnotatedCount} was annotated, while the rest was unsuccesful."
);
}
public void AnnotateRoleMembers(string annotationName)
{
AnnotateRoleMembersAsync(annotationName).Wait();
}
}
var graphHelper = new MicrosoftGraphHelper(clientId);
graphHelper.AnnotateRoleMembersAsync(annotationName);如果你只想运行一次脚本,到这里就可以直接运行了,无需完成后续步骤。
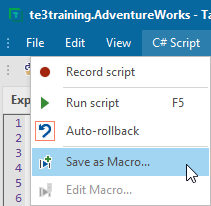
第 3 步:将脚本保存为宏
要把脚本保存为可复用的宏,请点击 C# Script > Save as Macro。
这样脚本就会出现在所选类型的上下文菜单中。
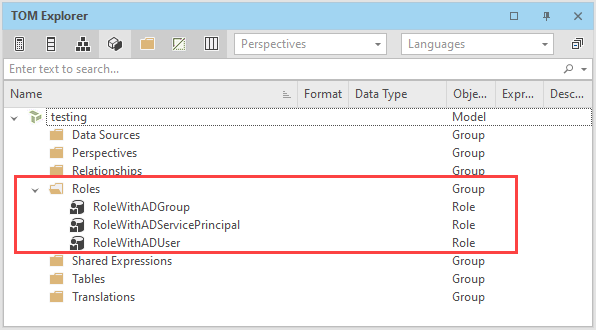
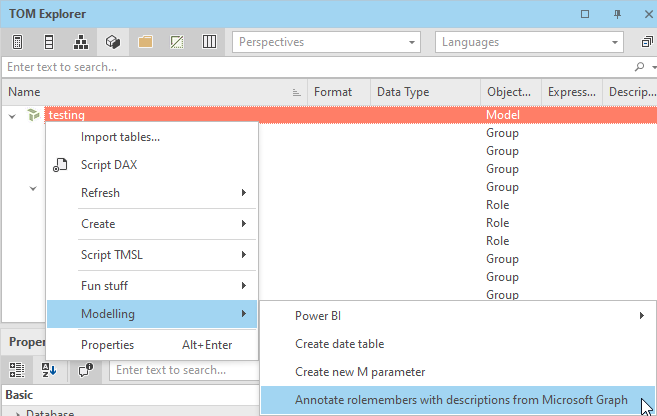
同时选择 Model 和 Role 后,你就可以对一个或多个角色右键来进行选择性处理;也可以对模型右键,让它遍历所有角色。

注意 |
第 4 步:测试宏
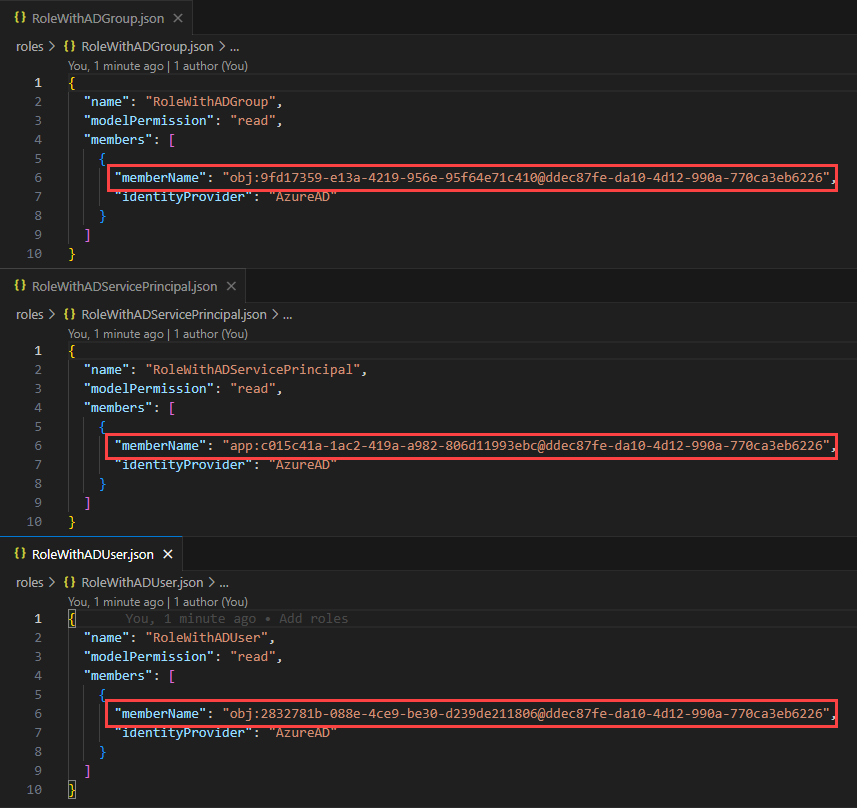
为了测试脚本,我创建了一个包含 3 个角色的模型。 每个角色都包含 1 个成员,分别是组、用户或服务主体:

当我在模型上右键调用宏时:
系统会提示我登录(以便查询 Microsoft Graph),登录后脚本会处理这些角色及其成员。
最后,你会收到一条错误信息,或者一份清晰的汇总,说明修复了哪些内容:
现在你可以把这些注释保存回模型了。
第 5 步:验证结果
为了验证结果,我使用 save-to-folder 把更改写入一个启用 Git 的文件夹,然后查看差异;可以看到,我的所有角色成员都已被注释上描述信息:

总结
希望你喜欢这篇文章。通过 C# Scripting 使用 Microsoft Graph 的潜力非常大,而这只是一个小示例,展示了你可以做到什么。
欢迎在下方留言提问或分享想法。

