
Key takeaways
- Several ways to secure data: Row-level security (RLS) filters rows, while object-level security (OLS) filters columns and tables.
- Secure in the model or in OneLake: You can configure RLS and OLS in a semantic model, or set up RLS, OLS, and column-level security in OneLake for Direct Lake models.
- This article focuses on RLS: It covers RLS in common Power BI scenarios, with other scenarios left for future articles.
- Set up RLS carefully: Your model must be designed properly so RLS works as expected without hurting performance.
- Static or dynamic RLS: Static RLS suits simple cases; dynamic RLS, filtering by USERNAME or USERPRINCIPALNAME, is far more common.
This summary is produced by the author, and not by AI.
NOTE
Update January 2026: Tabular Editor now supports using CUSTOMDATA with user impersonation to test RLS for Power BI embedded.
Data security for Power BI semantic models
Securing your data in Power BI is obviously very important, and involves managing permissions, roles, and data security. There are multiple ways to secure the data in your semantic model, including row-level security (RLS) and object-level security (OLS) in Power BI semantic models and OneLake security in Fabric.
The following diagram gives a brief overview of the different ways to set up data security for a Power BI semantic model:
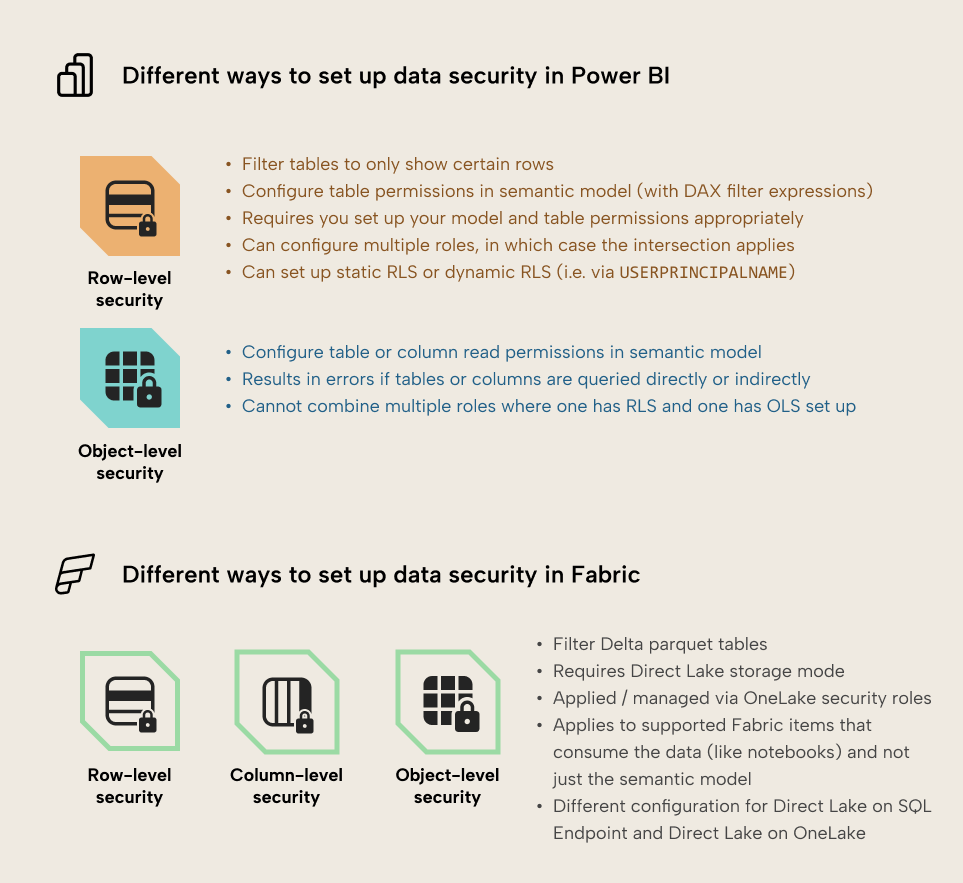
- RLS filters your data to only show the rows you define in a security rule, using DAX.
- OLS lets you set the read permission for tables and columns in the model. If someone without this read permission tries to query those columns or view report visuals that rely on them (directly, like when the column is included in a query, or indirectly, like when the column is referenced by a measure used in the query), they see an error.
- OneLake security can incorporate table and folder security (OLS), column-level security (CLS) and Row-level security (RLS), but is only available in Fabric for Direct Lake semantic models.
If you have Fabric, the main benefit of setting up data security in OneLake is that it propagates to all downstream items that query the Delta parquet tables in Fabric. This means that different Direct Lake semantic models and artifact types can use the same security rules, which are centrally maintained. This can help ensure better management of your data, particularly in decentralized scenarios. However, it doesn't apply to import models that import a copy of these tables into memory.
Obfuscation isn't security
Among Power BI users and communities, there are often discussions about alternative methods to secure data in reports, such as “page-level security” in Power BI reports or setting Tables to Hidden or Private in Power BI semantic models. These methods obfuscate data or access, but to be abundantly clear, they are not security. Only the methods listed above (RLS, OLS, and CLS in OneLake security) are valid ways of securing your data. Alternative workarounds still can leave your data exposed from other attack vectors.
Note that security also involves other concepts beyond data security, too, like permissions management, network security, and more. For more detailed information, see the Power BI security white paper and the related Fabric security white paper from Microsoft.
This article focuses on RLS
In this article, we focus on data security (specifically, RLS) in Power BI. In future articles, we might discuss OLS in Power BI and data security in OneLake.
TIP
If you have a hard time visualizing what RLS and OLS actually does in a model, please see these examples, which walk through all the possible scenarios of RLS and OLS in Power BI. These scenarios don’t yet have examples for CLS from OneLake security.
WARNING
RLS on a Direct Lake semantic model in Fabric should be configured using Direct Lake on OneLake. If you set up RLS on a model using Direct Lake on SQL Endpoint, then the model falls back to DirectQuery, which results in poor query performance, so you miss out on the benefits of Direct Lake.
For more information, see row-level security in OneLake and integrate Direct Lake security in the Microsoft documentation.
How to set up RLS
To set up RLS, follow the below steps:
- Ensure that you have the necessary configuration. This is mainly relevant for Direct Lake and DirectQuery semantic models. This involves configuring the connection or gateway (if you use one) to use single-sign on (SSO), among other activities.
- Ensure that your data and model will support RLS. RLS functions according to your model design. You define table permissions which are filter expressions typically on dimension tables (tables which group the data, like Customer) in a semantic model. RLS works by filtering these tables, and these filters traverse relationships to filter other, downstream tables (like fact tables, such as Sales). If your relationships aren’t set up properly, or your model is poorly designed, then RLS might not work as you expect, or it might lead to poor performance and slow reports. This is especially common when you have disconnected tables (tables without relationships), or atypical relationship properties like bi-directional or many-to-many relationships.
- Create a new data security role in the semantic model. You can create data security roles in Power BI Desktop, Tabular Editor, or programmatically. You assign users to roles in the Power BI service to apply the data security rules. A user can belong to multiple roles. See these figures for examples.
- Add a table permission expression to a specific model table. A table permission is the data security rule, expressed as a DAX filter expression. This filter expression is evaluated for each row of that table, returning TRUE or FALSE. If the table permission expression returns TRUE, then a user will see the data. If false, they won’t.
- Assign users to roles in the published model. You do this via the security settings. Any users that aren’t in a role won’t be able to view downstream items like reports or query the model, even if they have access to it. We recommend that you use Microsoft Entra security groups to manage role membership and model access.
- Provision model access. You can give access in multiple ways, but you should ensure that users only get view, read, or build permissions, and not edit/write permissions.
NOTE
If you apply table permissions to multiple tables in your model, then users will only see the data where all these filter expressions return TRUE.
WARNING
RLS doesn’t apply when you give someone edit (or write) permissions to a semantic model. This happens either if you give a user edit permissions directly on the item, or if you give a user Admin, Member, or Contributor workspace roles. Anyone with edit permissions can see all data from a semantic model, irrespective of whether you set up RLS or not. That’s because if they can edit the model, then they can edit security roles and rules.
From our colleague, Greg Baldini: “Enforcing a security rule against an editor would give a false idea of security. It would be like giving someone a key to your house that opens all the doors, but expecting them to only come in the front door when you invite them.”
Also, ensure that your RLS applies to all sensitive data in your model, irrespective of whether you will show it in reports, or not. It’s a mistake to think that just because data isn't in visuals that users cannot see it. For more information, see our related blog, 5 ways that you could be unintentionally leaking data from Power BI in your organization.
How to add security roles to a semantic model
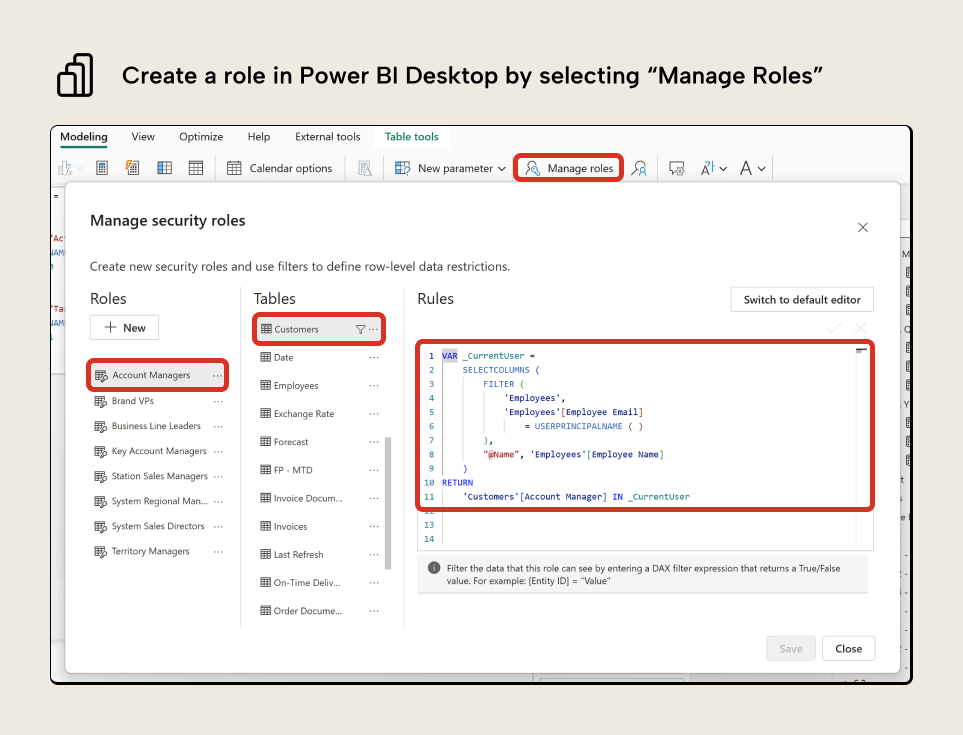
Adding security roles is straightforward. In Power BI, you can do this via the “Modeling” tab, selecting “manage roles”. You can create a role, then choose a table where you want to add a filter expression (under rules). An example is below for the Account Managers role, where the Customers table has a filter expression defined (we explain this later when we discuss Dynamic RLS, and also mention why this filter expression is suboptimal):
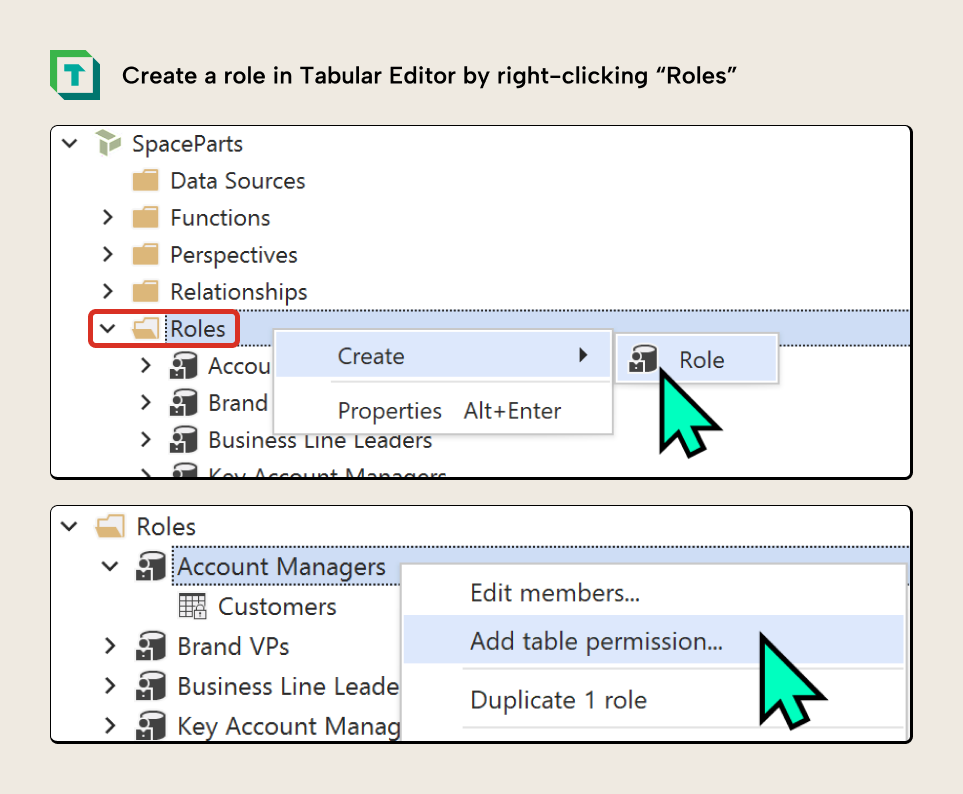
In Tabular Editor, you right-click “Roles” in the TOM Explorer, and select “Create > Role”. You can right-click a role to add a table permission, which lets you define its filter expression:
Once you add roles to your Power BI semantic model, then you must add users to these roles in the published model’s security settings for them to read reports, use Copilot, or consume the model in other ways. This is true even if the roles have no table permissions defined. If you don’t do this, then users will see errors. This is also true if you have a Direct Lake model on OneLake, for data sources that have security roles defined with OneLake security.
Adding role objects to your model is trivial. Indeed, most of the effort in setting up RLS involves accounting for it in your model design and writing good filter expressions that return the desired results with minimal performance overhead. This differs depending on whether you are implementing static or dynamic RLS.
Static RLS
Static RLS refers to row-level security rules that don’t change depending on the user. Instead, the rules are statically defined in the table permissions. Consider the following example of a semantic model that has different roles for each commercial region:
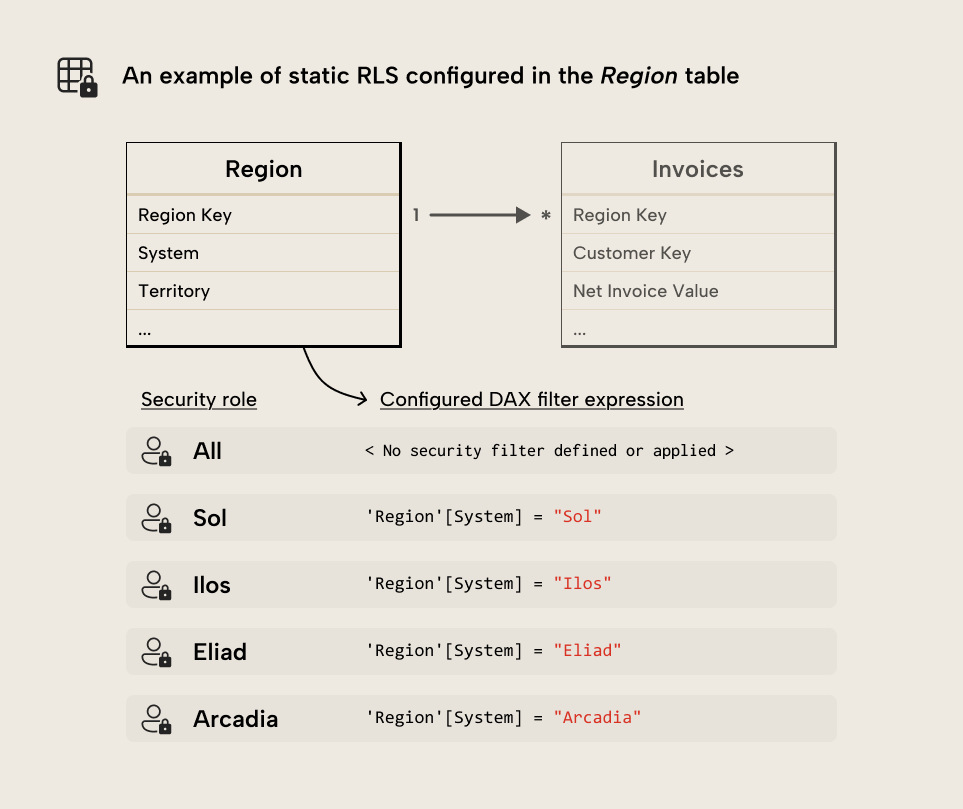
// Sol Role - Table Permission for the 'Region' table :=
'Region'[System] =
"Sol"
This example demonstrates the simplest RLS that you can define, where you have one role for each member of a dimension (in this case System). You can also define roles where users can see multiple members:
// Sol and Ilus Role - Table Permission for the 'Region' table :=
'Region'[System]
    IN {
        "Sol",
        "Ilus"
    }
Additionally, you can also have a role for users like an executive who can see all the data (where there is no security filter expression for that table). You then would add users to each role according to which region’s data they should see (again, using Microsoft Entra security groups to streamline the future management of this).
This simple RLS implementation is feasible if you use security groups to manage role membership and semantic model access. However, static RLS isn’t very common, because it’s limited. It’s rare that an organization has such clean data security rules, and it can be complex to manage. Consider an example where you want to give account managers in an organization access to customer sales data, but you want to restrict each account manager to only see the data for accounts which they’re responsible for. Using static RLS, this would be a nightmare; you’d easily end up with dozens or hundreds of roles, and keeping this up-to-date would be absurd.
In this scenario, it would be simpler to manage using dynamic RLS.
Dynamic RLS
Unlike static RLS, dynamic RLS involves filtering the data according to the user’s name or email, which appears in a data table. For instance, in a Customer or Region table, you might have the Account Manager or Regional Director. You can use this information to filter the data dynamically depending on who is looking at the report or querying the model. You do this using the USERNAME or USERPRINCIPALNAME DAX functions.
USERNAME or USERPRINCIPALNAME return the current user’s email. When you use this to filter, you must have that information in your model data. This might be the case for master data which includes managers or representatives for key business areas.
An example of this is in the SpaceParts model, which has an Employees table with employee information, and a Customers table that names each account manager for a particular customer category:
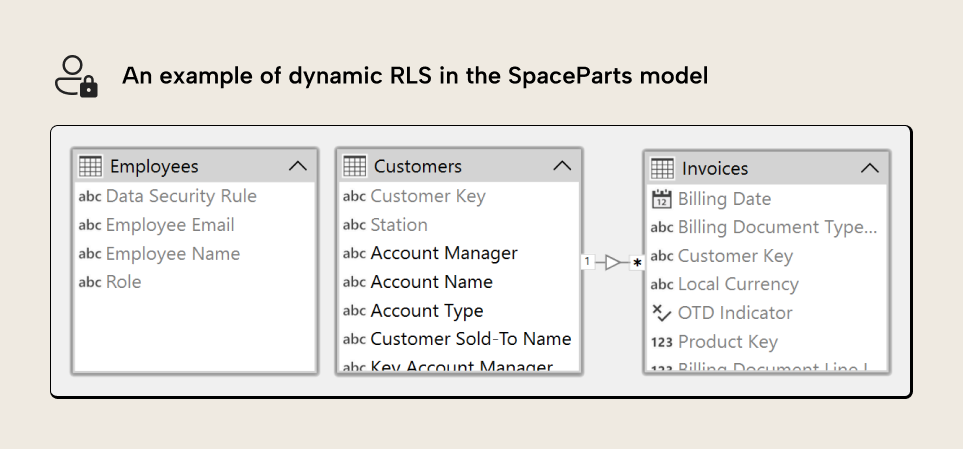
// "Account Manager" Role – Table Permission for the 'Customers' table :=
VAR _CurrentUser =
    SELECTCOLUMNS (
        FILTER (
            'Employees',
            'Employees'[Employee Email]
                = USERPRINCIPALNAME ()
        ),
        "@Name", 'Employees'[Employee Name]
    )
RETURN
    'Customers'[Account Manager]
        IN _CurrentUser
Here, a separate Employees table contains employee information, including names and emails. We can filter the table to return only rows where the Employee Email equals the USERPRINCIPALNAME of the user looking at the report. This lets us obtain their system name, which is present in other tables in various columns for employee roles.
The purpose of this setup is that users will see the data exactly as it’s structured in the model. Any updates to customer master data will automatically propagate to the data security; account managers will only see data for the customers they’re responsible for. We only need as many rules as there are roles.

Note that the SpaceParts model is intentionally structured in a suboptimal way, since it’s used in our Tabular Editor Learn enterprise courses to teach you about model management and optimization. Ideally, the table permission for Customers above would have a much simpler filter expression:
// "Account Manager" Role – Table Permission for the 'Customers' table :=
'Customers'[Account Manager] =
USERPRINCIPALNAME ()
If you want to know more about setting this up in Tabular Editor 3, we cover it in our free enterprise training course, including slides, videos, examples, and practice questions.
Testing RLS
Once you configure RLS in a semantic model, you need to test it. This is crucial so that you are sure that:
- The RLS works as expected and users will see the results they are allowed.
- Data isn’t unexpectedly “missing” due to your table permission not working with your model the way you expect.
- Reports or queries aren’t slow because of the extra filter(s) applied by RLS.
Here’s three different ways to test RLS in a semantic model.
Method 1: Simulating RLS by using a DAX query
Since RLS is just a DAX table permission expression that operates on your model, you can just test this table permission in a DAX query. This is a simple and quick way to check what data would show, and whether the table permission is returning the results that you expect. You can do this in the DAX query view in Power BI Desktop, in DAX Studio, or in Tabular Editor’s DAX query window.
To do this, you should add your table permission to your query. If you’ve set up dynamic RLS, then you just must replace USERPRINCIPALNAME with the literal string of user emails that you want to test. The query result thus shows exactly what the table permission would evaluate if that user was looking at a report or querying the model.
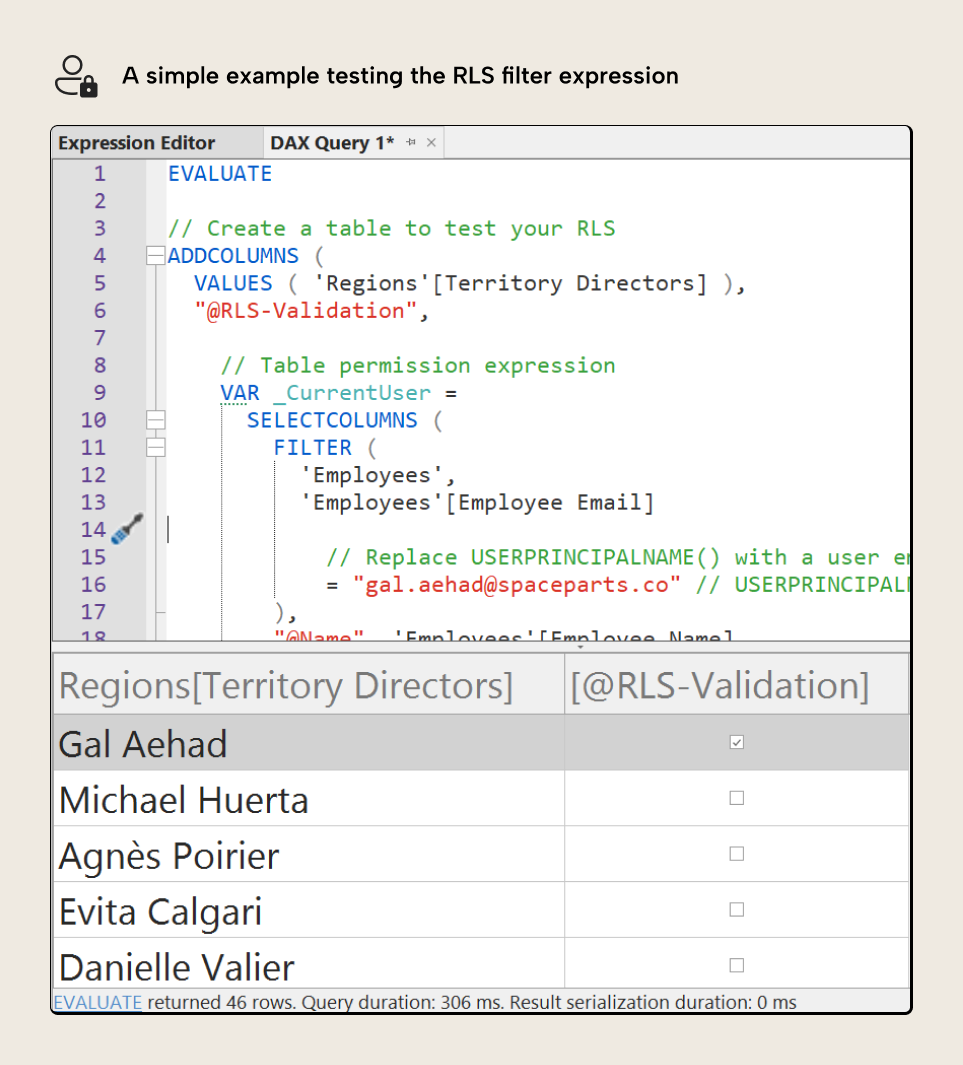
You can do this either by adding it as a separate column of the table (i.e. by using ADDCOLUMNS) or by using it as a filter in a SUMMARIZECOLUMNS or CALCULATETABLE argument. The below code shows an example of the first approach, a DAX query that uses ADDCOLUMNS to show what rows a user would and wouldn’t see:
EVALUATE
// Create a table to test your RLS
ADDCOLUMNS (
    VALUES ( 'Regions'[Territory Directors] ),
    "@RLS-Validation",
        // Table permission expression
        VAR _CurrentUser =
            SELECTCOLUMNS (
                FILTER (
                    'Employees',
                    'Employees'[Employee Email] // Replace USERPRINCIPALNAME() with a user email to test
                    = "gal.aehad@spaceparts.co" // USERPRINCIPALNAME ()
                ),
                "@Name", 'Employees'[Employee Name]
            )
        RETURN
            'Regions'[Territory Directors]
                IN _CurrentUser
) // Order from TRUE() to FALSE()
// Where it is TRUE() the data will be visible
ORDER BY [@RLS-Validation] DESC
When you run this query, you see the full list of Territory Directors with a column “@RLS-Validation” that evaluates the filter expression from the table permission:
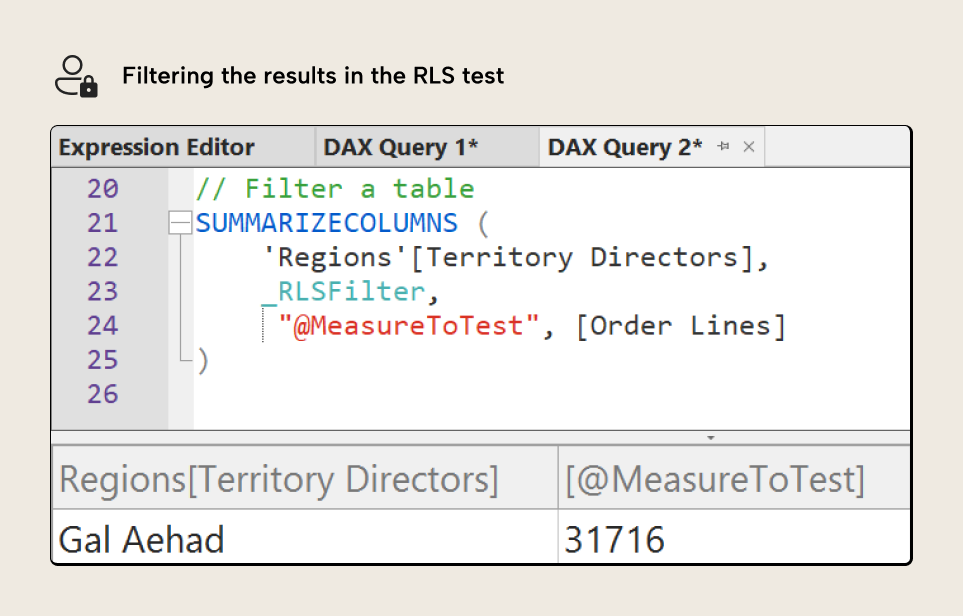
In the previous query, the rows with TRUE will be seen by the user. The rows with FALSE will not. To simplify this, you can also just use filter expression inside of SUMMARIZECOLUMNS, like the following query:
EVALUATE
VAR _CurrentUser =
    // Table permission expression
    SELECTCOLUMNS (
        FILTER (
            'Employees',
            'Employees'[Employee Email] // Replace USERPRINCIPALNAME() with a user email to test
            = "gal.aehad@spaceparts.co" // USERPRINCIPALNAME ()
        ),
        "@Name", 'Employees'[Employee Name]
    )
VAR _RLSFilter =
    TREATAS (
        _CurrentUser,
        'Regions'[Territory Directors]
    )
RETURN
    // Filter a table
    SUMMARIZECOLUMNS (
        'Regions'[Territory Directors],
        _RLSFilter,
        "@MeasureToTest", [Order Lines]
    )
Running this query shows only the filtered results, shown below:
This is a simple way to test the RLS of your model without having to change security settings or dataset access. Furthermore, you can save and re-use these DAX queries either manually or as part of an automated CI/CD pipeline whenever you make model changes. This can be a good way to avoid unexpected (and potentially disastrous) issues when adding new data sources or adjusting existing ones.
Method 2: Testing RLS with impersonation
The previous test uses an approach to simulate users and roles, by modifying the table permission. However, you can also impersonate users and roles, which will show you exactly how they view the data.
In Tabular Editor 3, you can impersonate users or roles to see how data changes in table previews, pivot grids, and DAX queries. In Power BI, this impersonation only works in Power BI reports, which we describe in the next section.
To impersonate a user, you first must check that you’ve set up the following things:
- The user has view, read, and build permissions to the model.
- The user has been added to the correct security role.
- The user has the appropriate per-user license (like Power BI Pro or PPU). Users will always need a Pro license for impersonation, since a Pro license is required for build permissions.
Once you’ve set up these things, you should set up a table data window, pivot grid, or DAX query for the data that you want to test. Select impersonate user and you can then enter the e-mail or select the role that you want to impersonate.
You can see a demonstration of this below:
NOTE
It’s generally a good idea to perform this testing with a dummy or test account, if you have one available. For instance, if you have an account powerbi@spaceparts.co, you can temporarily replace an existing user’s email with this test account in the data. Then, you can add this test account to the security role and provision model access, allowing you to impersonate as the test account without risking the user discovering or querying the model while you test.
Testing by impersonation is a good way to ensure that you’ve configured RLS properly both in your semantic model and its configuration in Power BI or Fabric.
Testing Dynamic RLS with CustomData
As noted earlier, CUSTOMDATA is commonly used in embedding scenarios. Testing this type of dynamic row-level security is now straightforward with Tabular Editor 3. As of version 3.25, the Impersonation dialog includes a CustomData option, allowing you to pass a custom string value when viewing data, running DAX queries, or using Pivot Grids.
To test CUSTOMDATA-based RLS, click the Impersonate... button and enter your test value in the CUSTOMDATA input field. This adds the CustomData property to the connection string, which can then be retrieved in your role filter expressions using the CUSTOMDATA DAX function. For example, if your role uses the filter expression:
'Region'[RegionCode] =
CUSTOMDATA ()
You can enter "EMEA" in the CustomData field to simulate what a user with that region assignment would see. This feature is particularly valuable when building Power BI Embedded solutions, where CustomData is passed via the EffectiveIdentity object during embed token generation. By testing in Tabular Editor before deployment, you can validate your dynamic RLS logic without needing to build out the full embedding infrastructure first.
You can see a demonstration of this below:
Method 3: Testing RLS in Power BI reports and other downstream items
Sometimes, you want to test RLS end-to-end with the actual downstream artifacts that will connect to and query your semantic model. You can do this with Power BI reports or other Power BI and Fabric items that connect to the model, following the same steps as above. Impersonating in Power BI reports can be useful, because it doesn’t require that users have build permissions or a Pro license.
To see step-by-step how to set this up, check the Microsoft documentation.
Of course, if you are testing with a dummy/test account, you can also login to that account on a separate session to do a full, end-to-end test, either manually or with automated browser control. This might be useful if there are many different ways of consuming your semantic model, including notebooks, data agents, and Copilot for Power BI. If you would like to see us demonstrate this in a future article, let us know!
Note that you can also extract the queries from Power BI report visuals or other item interactions, too, then test these queries automatically using the approaches defined, above. This is particularly helpful if you already are connecting query logs for your semantic model, which is both interesting and incredibly valuable. We will discuss this in a future article.
For further reading
- OLS in Power BI (Tabular Editor Blog). Explains object-level security in detail, including how it differs from RLS and how to configure table and column visibility in Tabular Editor.
- 5 ways that you could be unintentionally leaking data from Power BI (Tabular Editor Blog). Covers security gaps that can bypass RLS expectations, which is useful context when validating a secured model.
- Row-level security (RLS) with Power BI (Microsoft Learn). Microsoft's guide to static and dynamic RLS patterns, with instructions for testing roles in the Power BI service.
- Object-level security (OLS) (Microsoft Learn). Describes OLS setup, limitations, and how it interacts with RLS in the same model.
In conclusion
There’s multiple ways to secure the data in your semantic model, including row-level security (RLS) and object-level security (OLS) in Power BI semantic models and OneLake security in Fabric. Row-level security filters your data to only show the rows defined in the table permissions’ filter expressions. Setting it up correctly is an important part of designing your model, but it’s essential to make sure your data is secure.
Define and test row-level security in Tabular Editor 3.
Give Tabular Editor a spin