
Key Takeaways
- Deploying shouldn't rely on your availability: Publishing from Power BI Desktop relies on you and what's open on your laptop. A
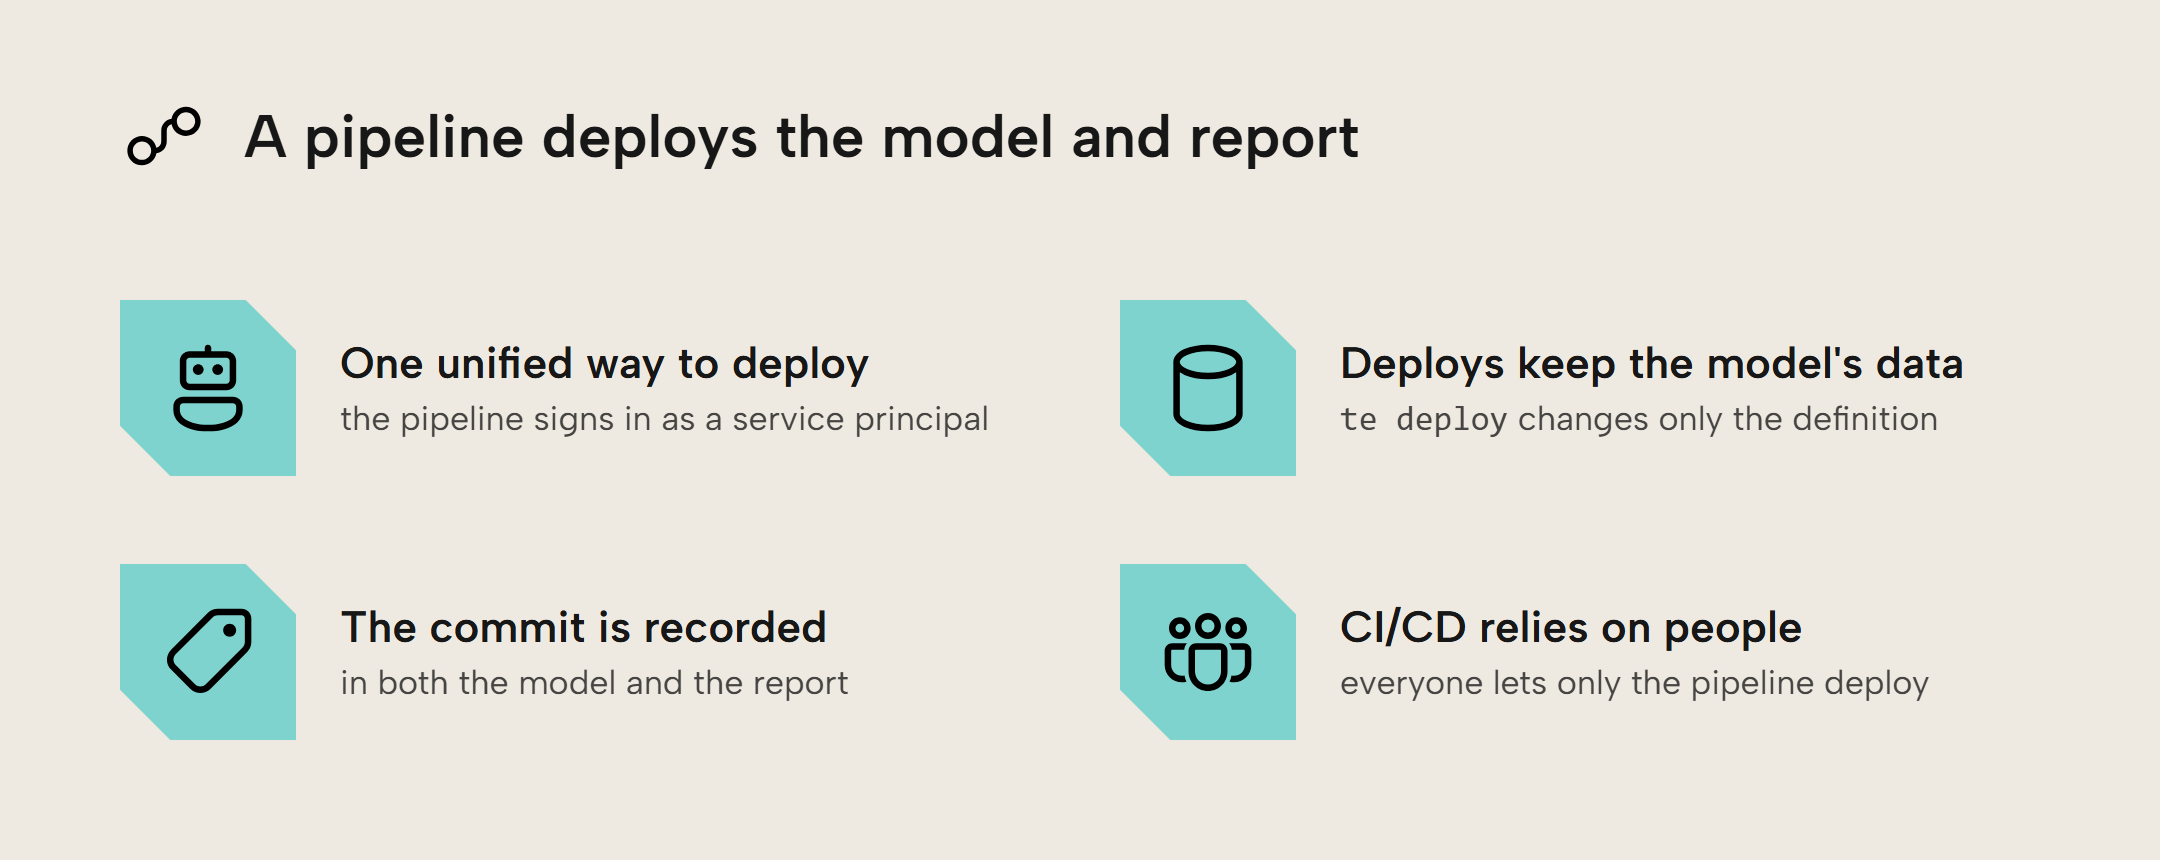
Deploystage after theValidatestage takes the same commit and deploys it to the workspace as a service principal, so deploys no longer depend on anyone's account or laptop. - Live assets should have matching commits: If the pipeline deploys assets such as models and reports, you should know which version is live. The pipeline can write the commit into the asset so it's always clear which commit is live.
- Only the pipeline should deploy: CI/CD is not just about having the right tools; it is mostly about behavior and following the agreed-upon practices.
This summary is produced by the author, and not by AI.
NOTE
Download the TE CLI from tabulareditor.com/download-tabular-editor-cli and try it during the limited public preview. At the time of publishing, we recommend against using the CLI in production CI/CD pipelines during preview because we may change commands, flags, and outputs before general availability. We're working toward general availability and welcome your feedback to help us improve the CLI. You can share feedback in Discussions and report problems in Issues, where we track them in our GitHub repository. The preview build will stop functioning after December 31, 2026. You'll need a license at general availability, and we'll announce pricing beforehand.
In our first and second parts of the "Deploy it right" blog series, we showed how source controlling a semantic model and validating every change made to the model already buys you a full history of every change and an automatic check on every push. Checking every change automatically is the CI in CI/CD (Continuous Integration); in this entry, we add the CD (Continuous Deployment) by letting pipelines do the deploys rather than you, yourself. Gone are the days of guessing which version of the model is live.
Deploying from a pipeline as a service principal is one of the practices Eugene describes at the silver level in Building CI/CD maturity for report development.
What you'll need for this part of the series:
- Git (as in part 1)
- The TE CLI, installed on your PATH, and its Linux archive committed to
tools/te/in your repository (as in part 2) - Python 3.10 or later and pbir-cli (as in part 2)
- An Azure DevOps or GitHub repository with the pipeline from part 2
- A workspace on a Fabric or Premium capacity, with the capacity's XMLA endpoint set to read-write, and your model published to it once from Power BI Desktop, with its data source credential set in the model's settings
- A service principal with a client secret, added to that workspace as Contributor, and allowed in the tenant setting Service principals can call Fabric public APIs
A publish can undo a checked change
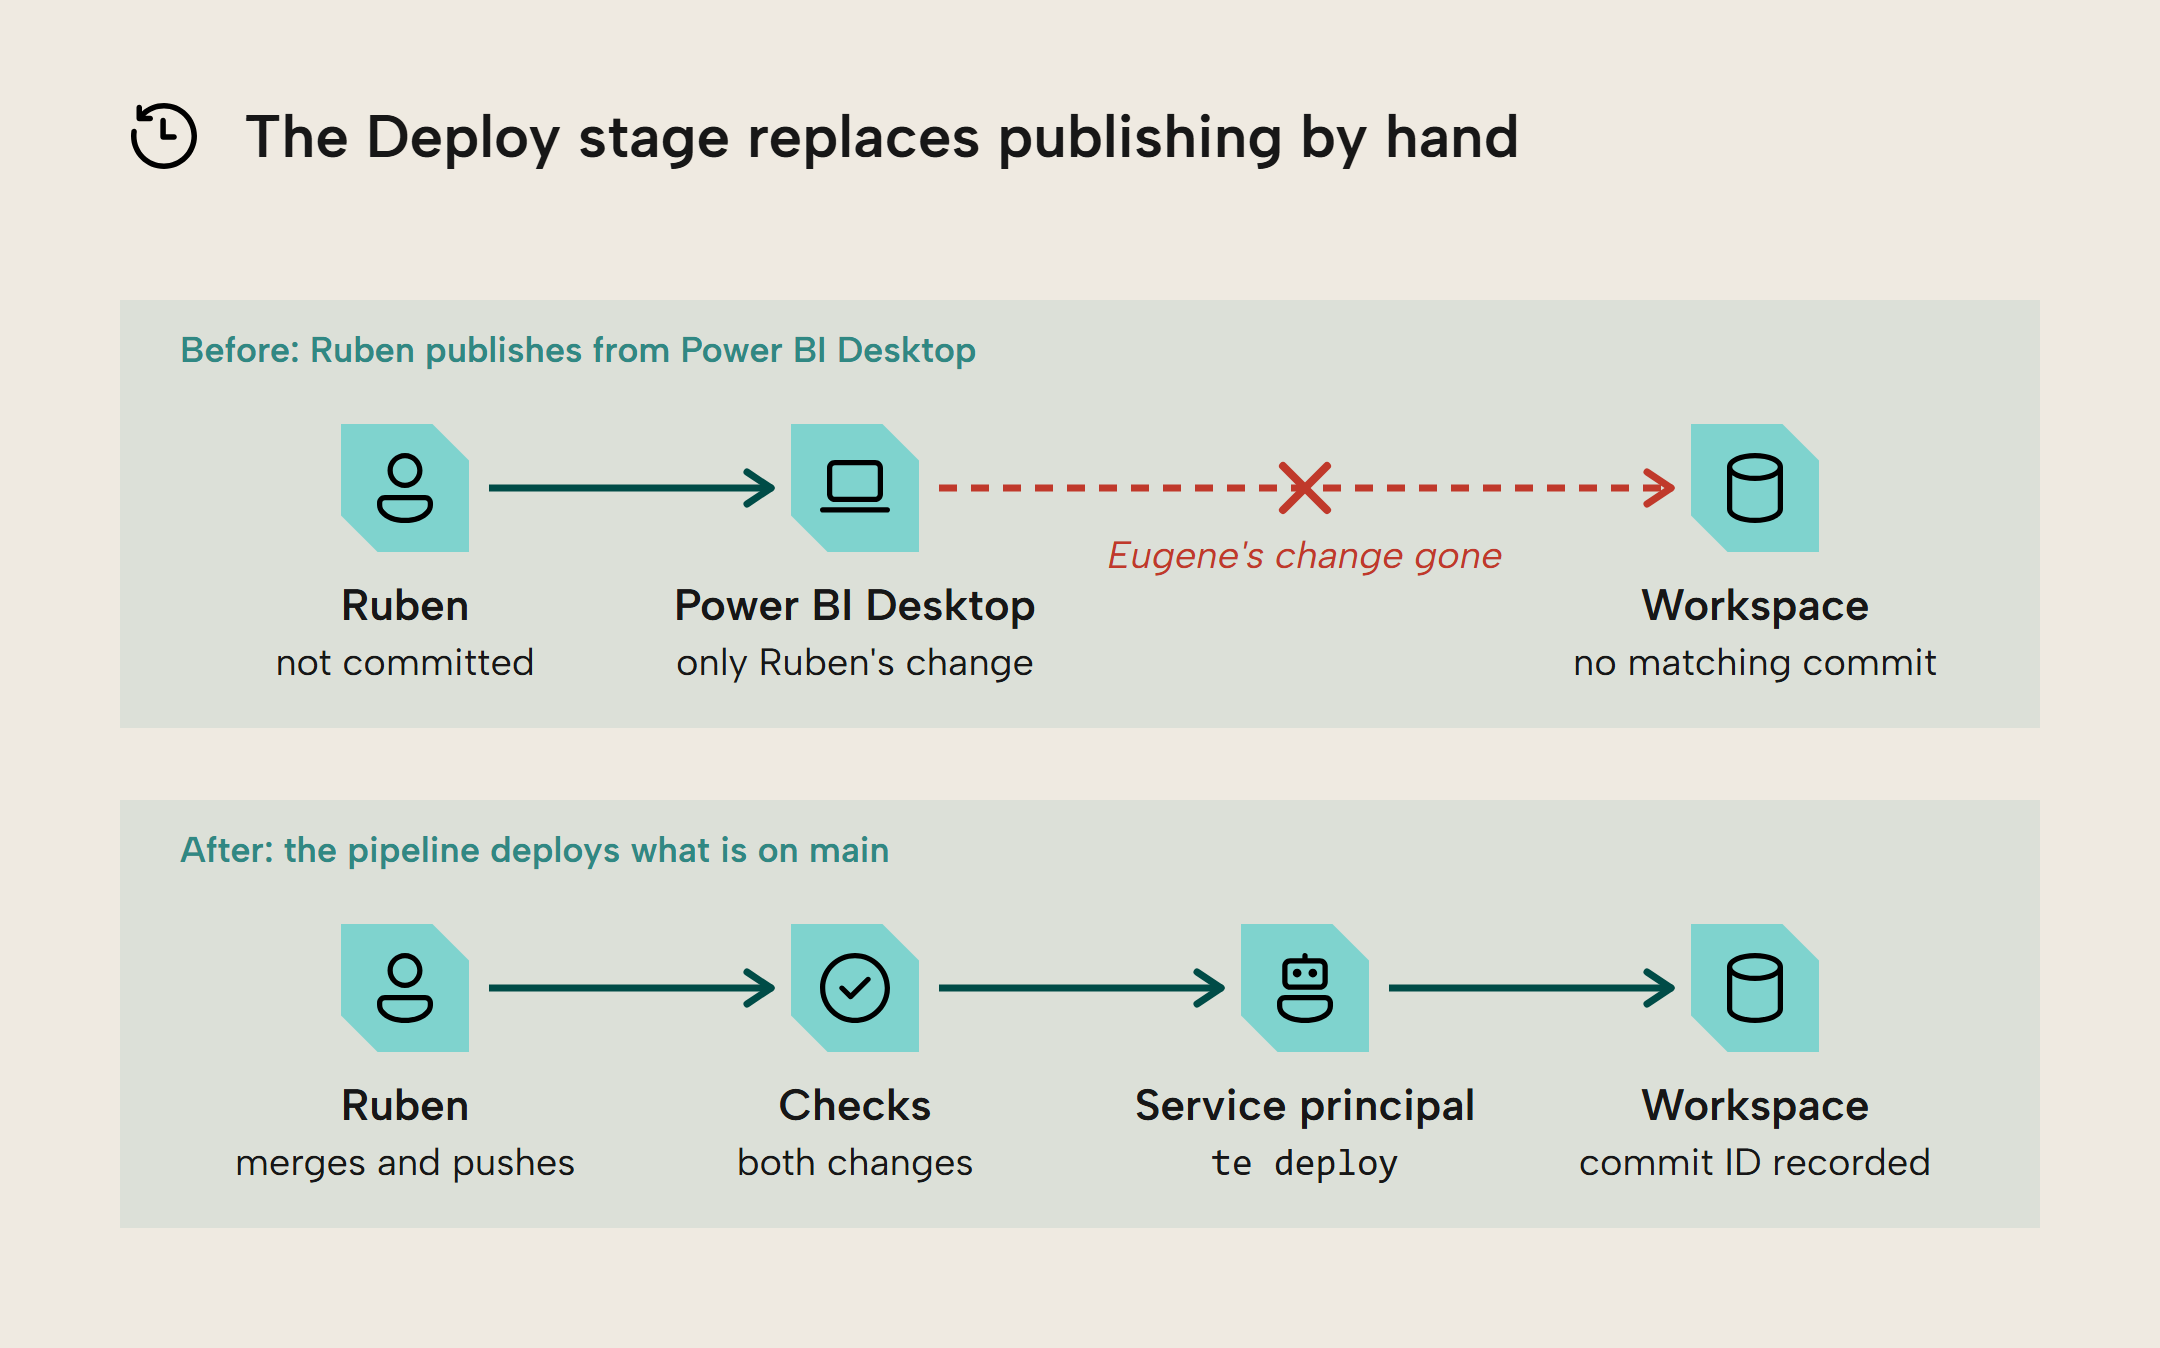
Eugene and Ruben still work at SpaceParts, Tabular Editor's fictional daughter company -- for now. In part 2, they set up a pipeline in Azure DevOps that checks every push to main, to ensure that models are valid, BPA rules are followed, and reports still find the fields they need. The pipeline up until now does not move any changes, so either Eugene or Ruben still has to update the workspace where their colleagues open the report. Eugene pushes his change to the main branch, waits for the checks to pass, then publishes from Power BI Desktop on his laptop. Ruben, careless as he is, publishes his own change without pushing or first pulling from the repo -- meaning he does not have the change Eugene published the day before and nukes it from the workspace.
Eugene finds his change missing from the workspace and asks Ruben for the commit that matches the published model, but none does because Ruben just published without committing to the main branch. Eugene's changes aren't lost (Git, remember), but they both want to prevent another incident like this. They need one single way to deploy so stepping on each other's toes isn't possible.
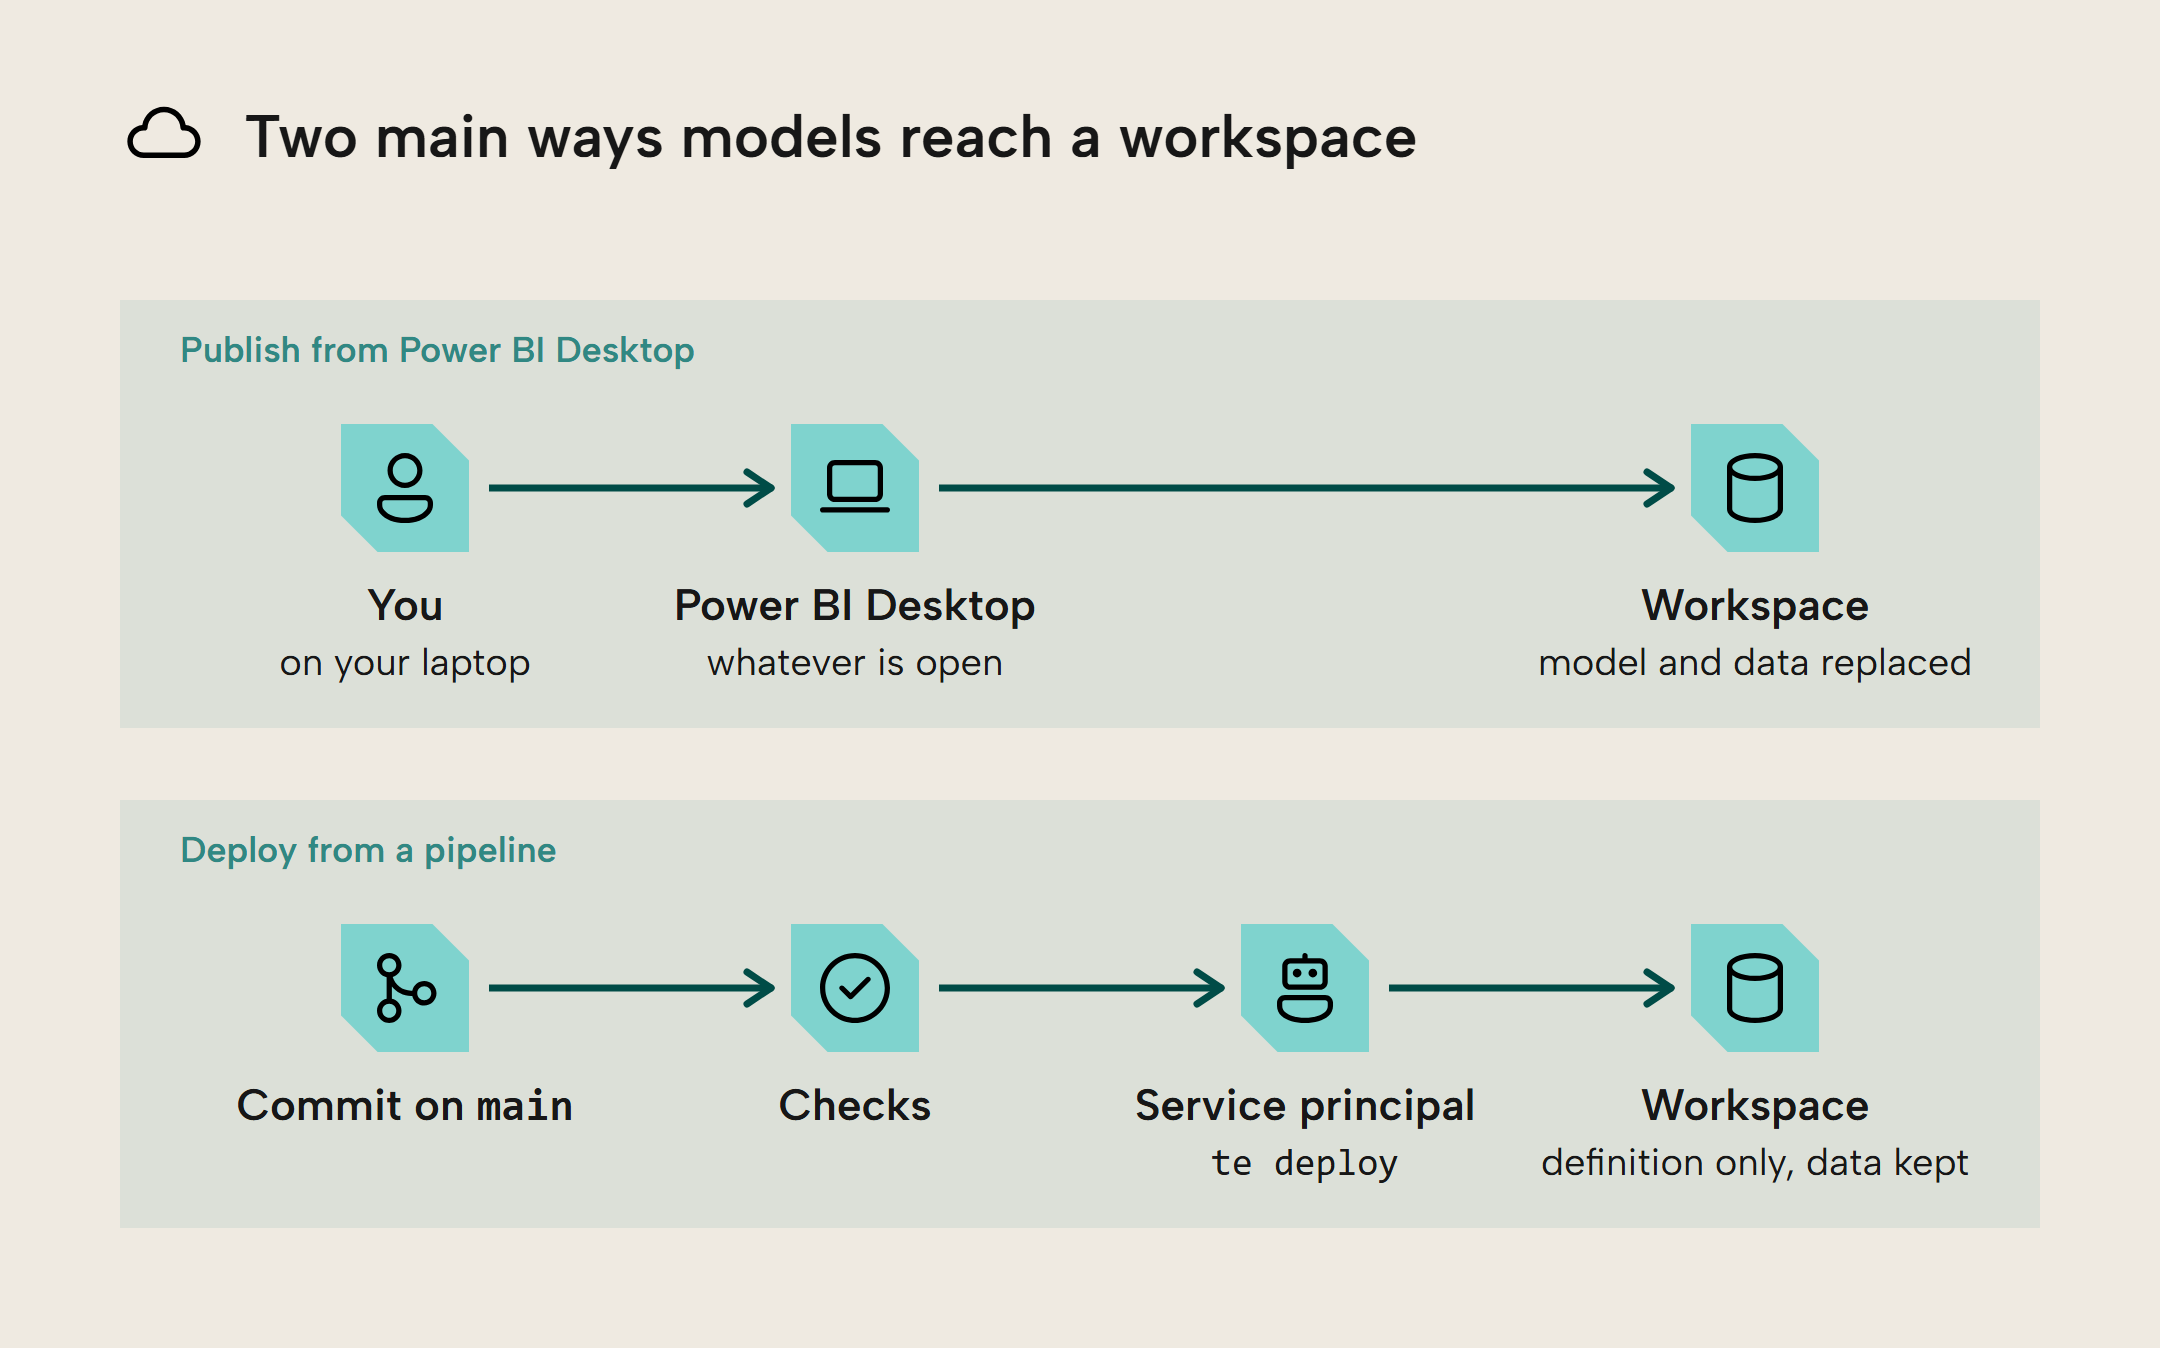
If you click the Publish button in Power BI Desktop and publish it to a Fabric workspace, it's your identity (you@company.com) doing the deploying, from your device. Microsoft calls this publishing: Power BI Desktop uploads the model including its data and replaces the model in the workspace. When a pipeline deploys with a tool like the TE CLI, it only uploads the model's definition, and the model in the workspace keeps its data and any credentials already set.
You can also use the Business or Enterprise edition of Tabular Editor 3 to deploy a model from your laptop. You deploy the model you have open, and like the TE CLI, Tabular Editor 3 only updates the model's definition.
Publishing from Power BI Desktop can be an adequate process, but it relies on you. With Power BI Desktop, you also publish whatever is open on your machine, whether or not it passed the checks from part 2, and nothing records which Git commit, if any, the published model matches. Power BI Desktop also makes changes on its own, such as adding hidden date tables or creating relationships when you load new tables. It's easy to publish changes from Power BI Desktop that you didn't make yourself. With models saved as text in Git, those changes are highlighted in the diff before you commit, and a pipeline only deploys what you committed and checked.
Deploying from the pipeline
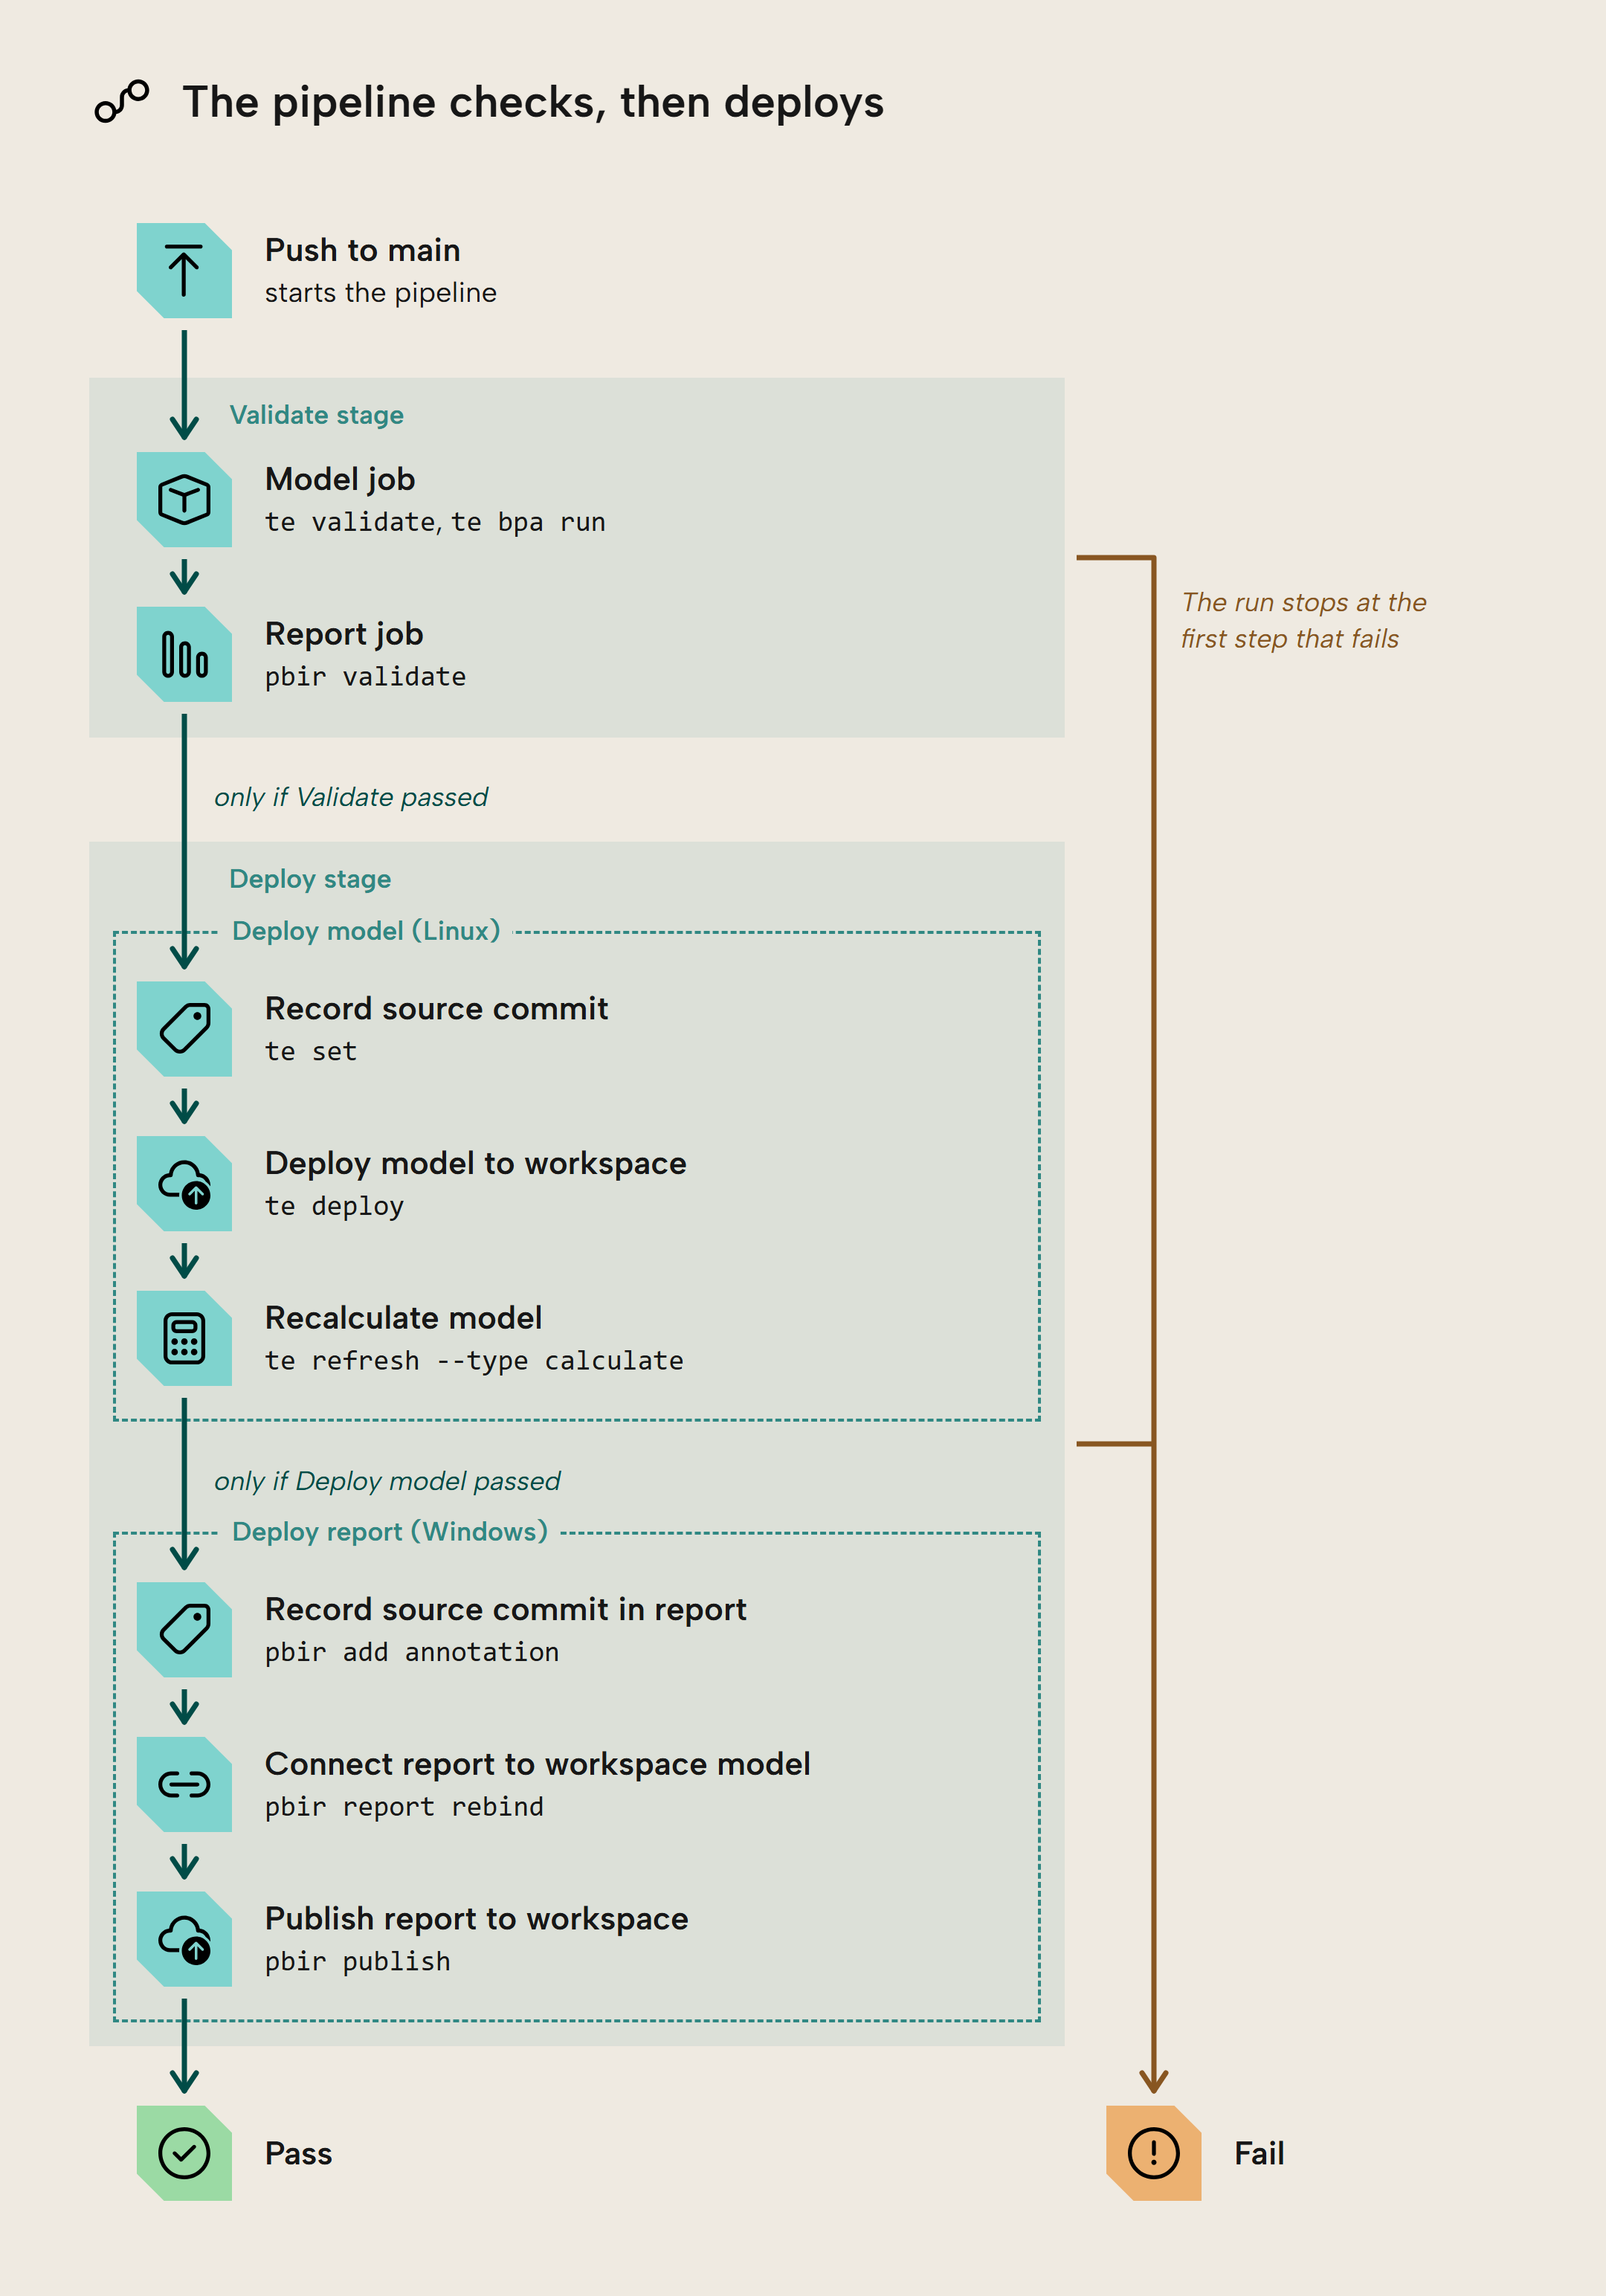
In this part, we transition from deploying ("publishing") from Power BI Desktop to letting a pipeline handle the deploys using a service principal. To the pipeline of part 2, we add a Deploy stage after the Validate stage. That new Deploy stage takes the same commit and deploys it to the workspace as a service principal.
A service principal
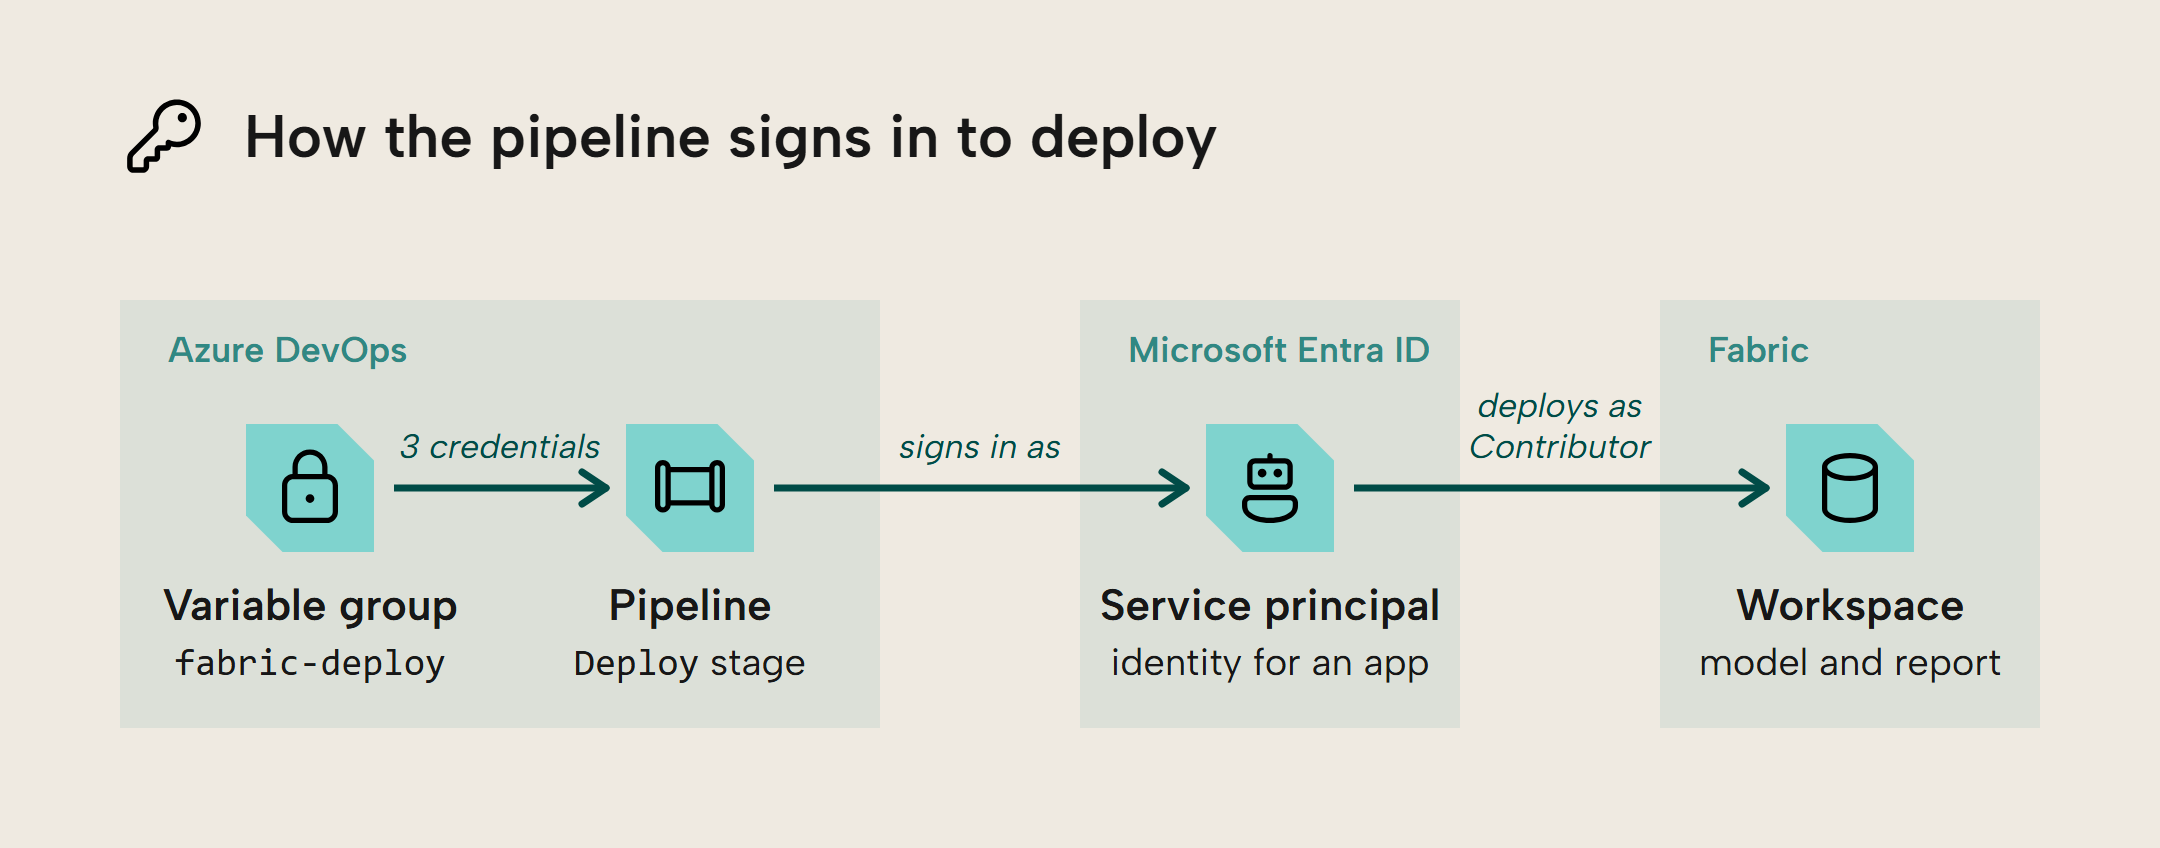
You could also let a dedicated identity take care of deploying: a service principal. A service principal is an identity for an application instead of a person. Just like you would a user, you give it access to the workspaces it needs to work in after creating it in Microsoft Entra ID. The pipeline signs in as the service principal using a client ID and a client secret. With a service principal, deploys no longer depend on user's accounts or laptops.
NOTE
You may need some help from your Fabric Admin to make this work.
- The tenant setting Service principals can call Fabric public APIs must include your service principal; it's on by default for new customers and can be limited to a security group, i.e. an Entra group for your service principal(s).
- The tenant setting Allow XMLA endpoints and Analyze in Excel with on-premises semantic models must be enabled; it's on by default.
- The capacity's XMLA Endpoint setting must be set to Read Write.
- The service principal needs the Contributor role or higher on the workspace, which grants it the write permission to all semantic models in the workspace.
A service principal makes changes in your workspace, so it has to sign in like any user with credentials. The service principal needs 3 credentials:
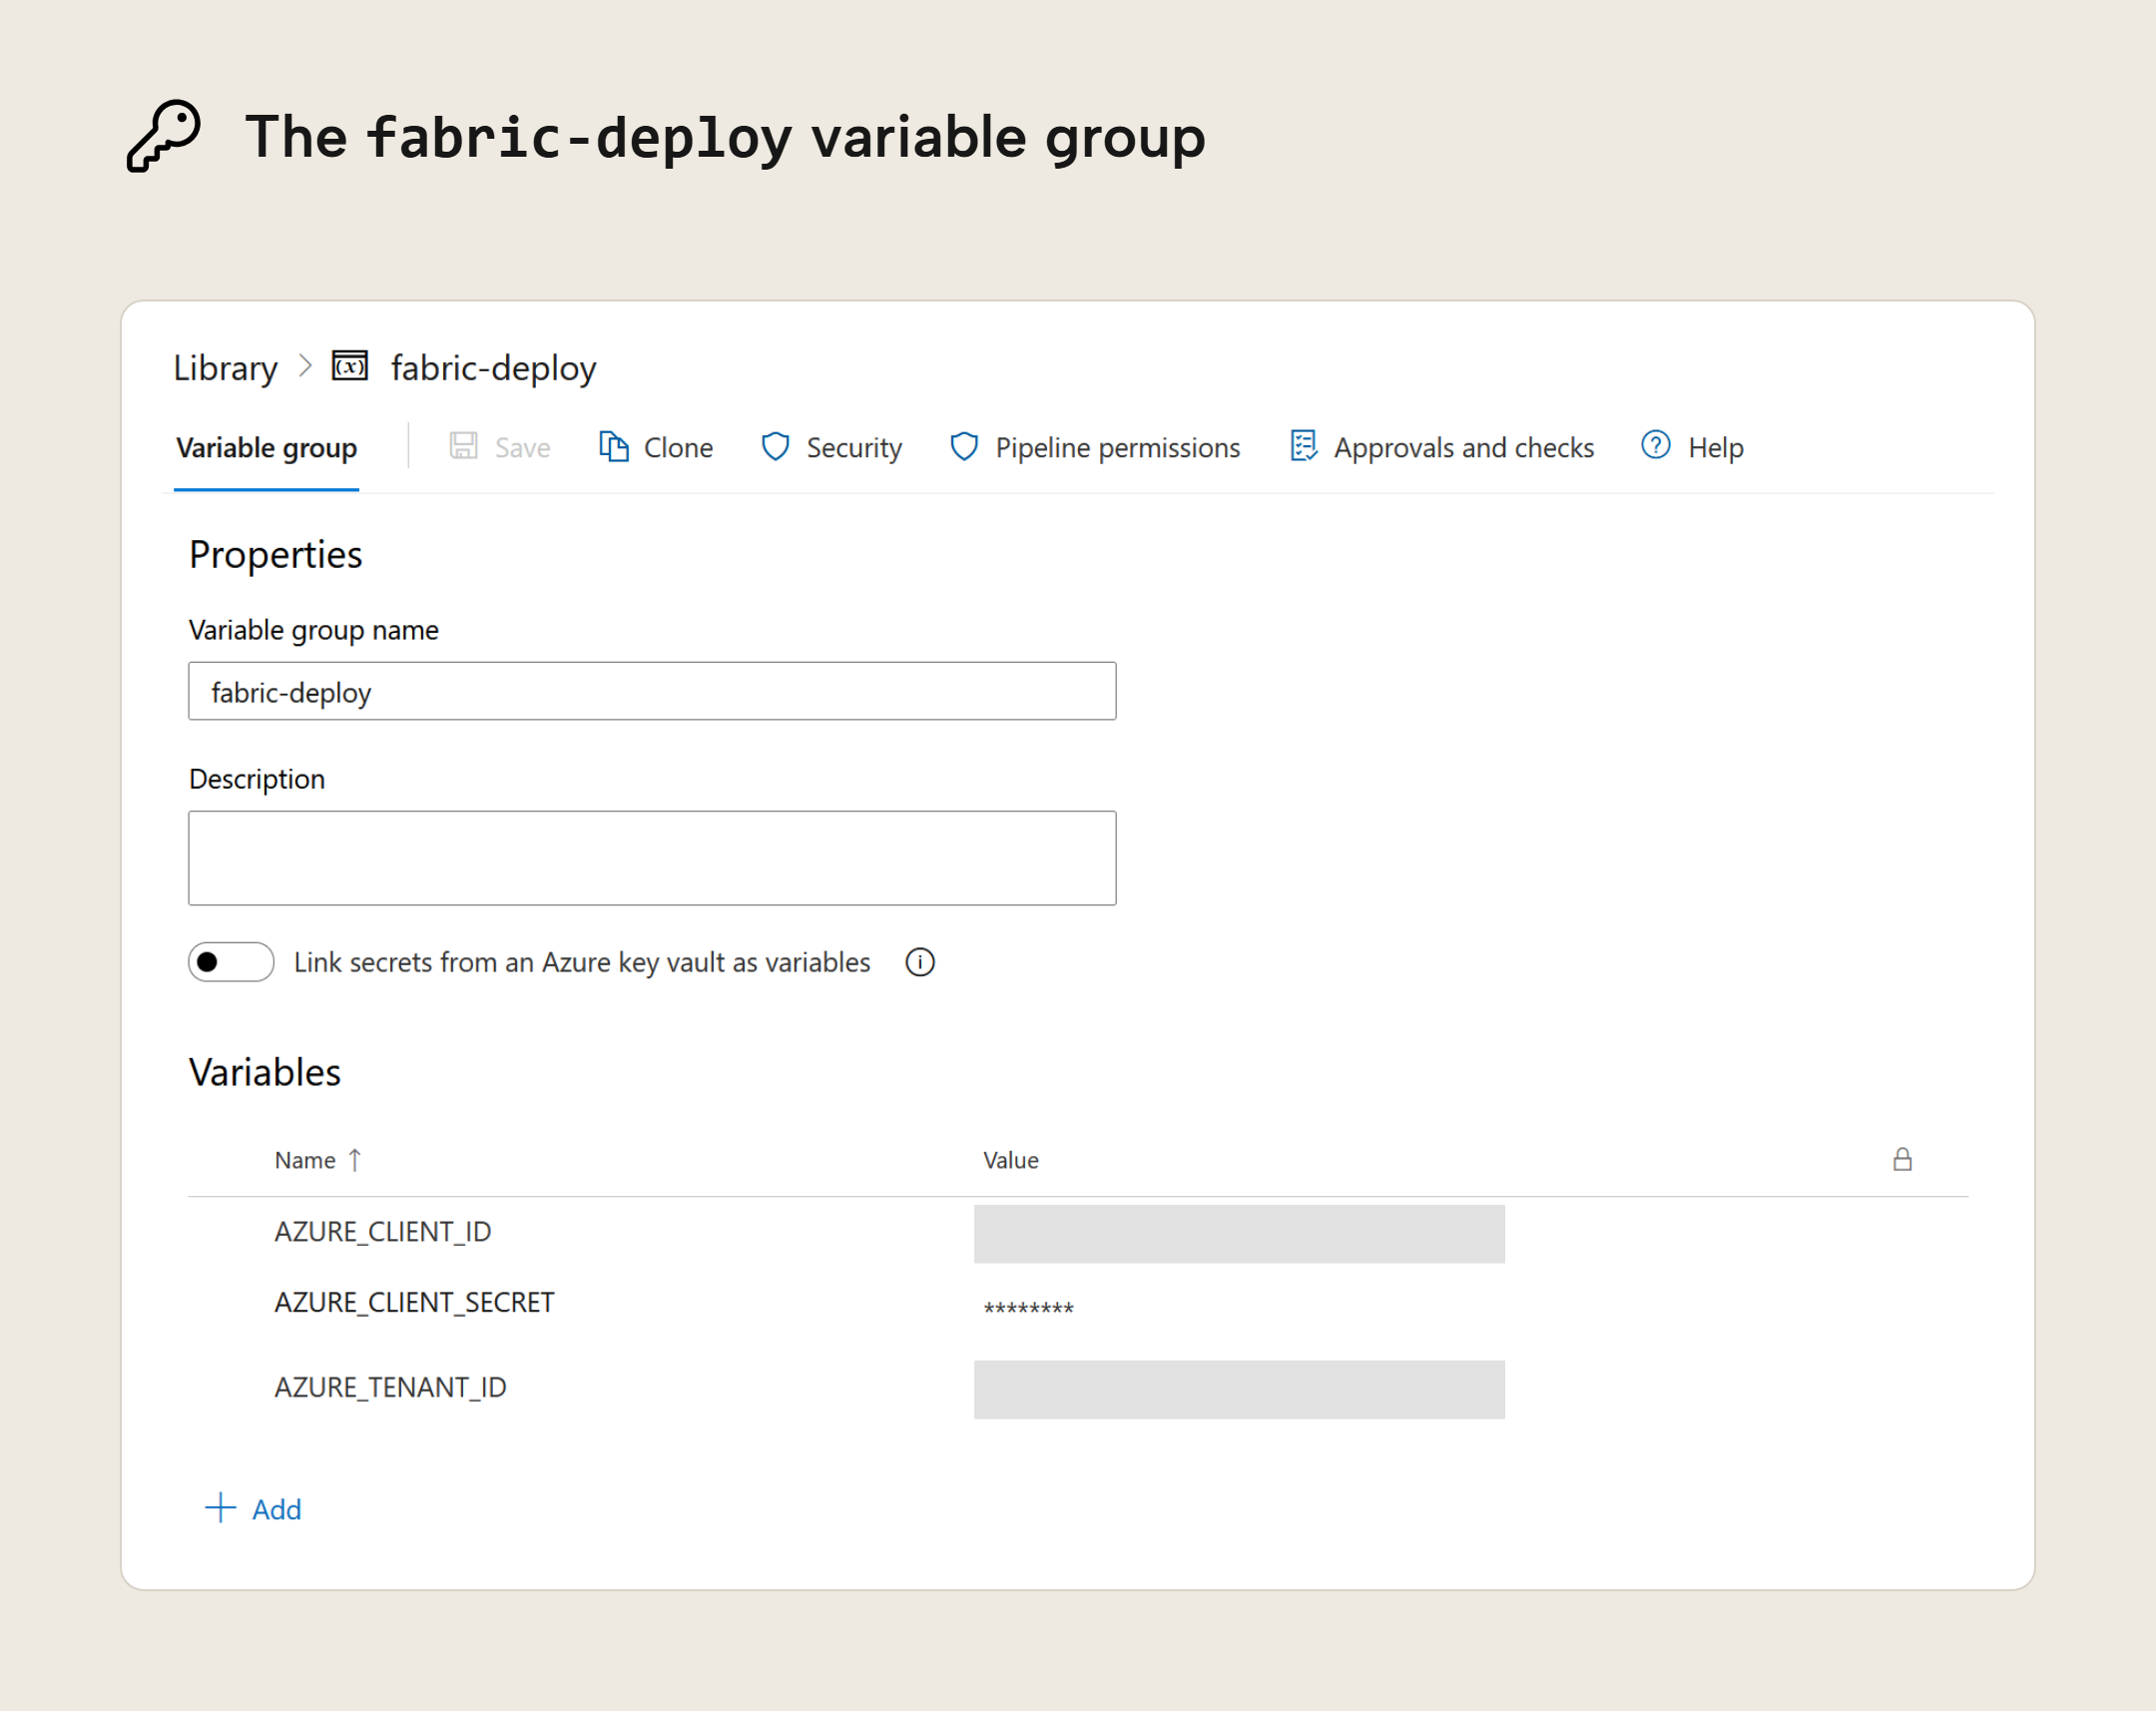
AZURE_TENANT_IDidentifies your organization's Microsoft Entra tenantAZURE_CLIENT_IDidentifies its app registrationAZURE_CLIENT_SECRETis its client secret, which works like a password
When the Deploy stage runs, it will read those 3 values from a variable group named fabric-deploy, in our example. You create it under Pipelines > Library and mark AZURE_CLIENT_SECRET as secret with the lock icon. In GitHub Actions, credentials like these are stored as repository secrets.
The pipeline reads the three values from fabric-deploy and uses them to sign in as the service principal, which is the registered application's identity in your tenant and has Contributor access to the workspace.
The Deploy stage
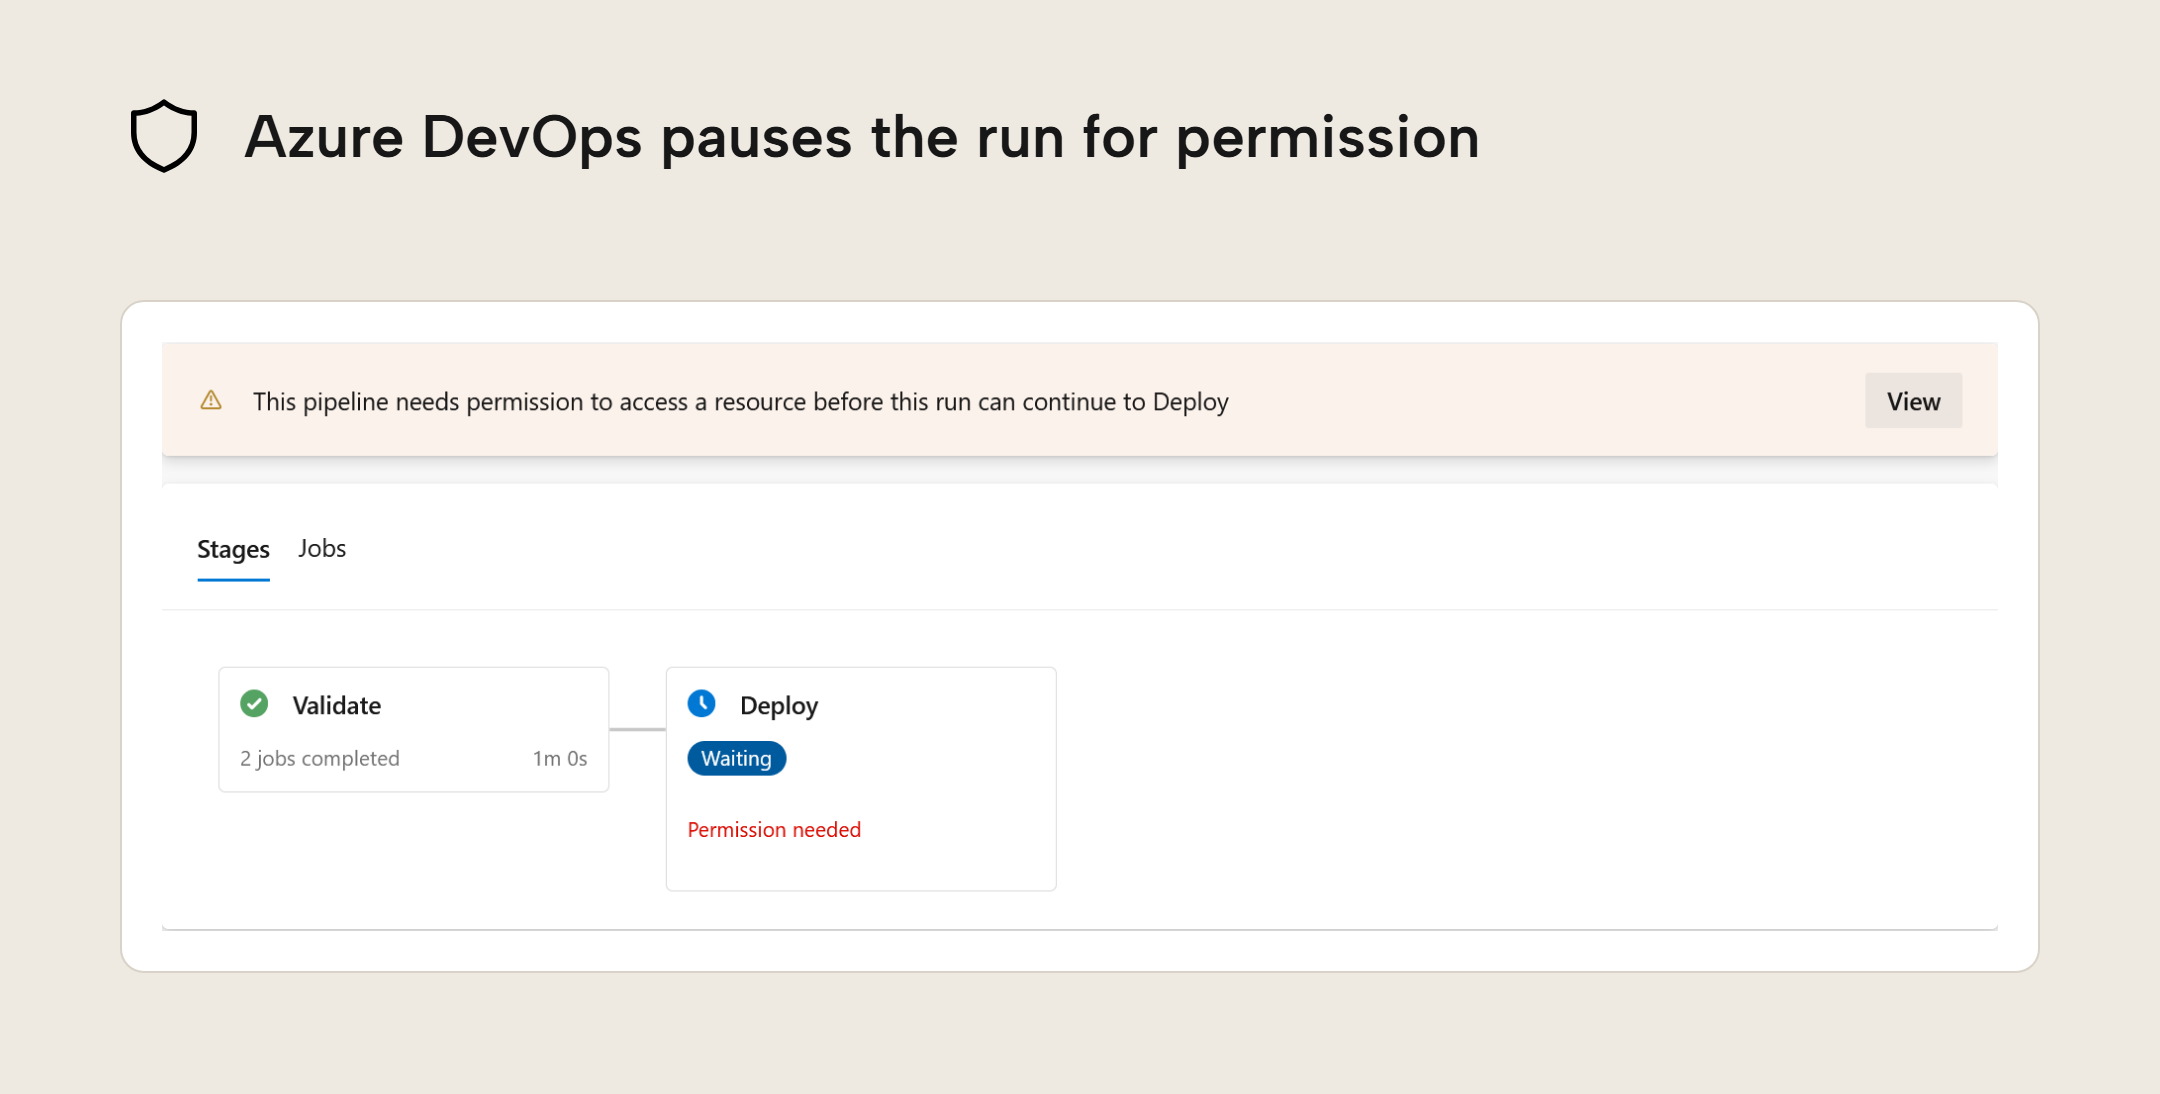
In Azure DevOps, a stage is a group of jobs, and a job is a group of steps that runs on one machine. This is different from a stage in a deployment pipeline in Fabric, which represents a workspace. Our pipeline now has two stages: Validate, with the two jobs (Model and Report) from part 2, and Deploy. A stage only starts when the stage before it passed. We give only the Deploy stage access to fabric-deploy, so the Validate jobs never receive the deployment credentials. Before starting Deploy, Azure DevOps waits for permission to use the group on the first run, and in part 4 we will use this pause to require approval before deploying to production. GitHub Actions has no stages; there, a job waits for other jobs with needs.
The TE CLI te deploy command lets the pipeline perform a metadata-only deploy, meaning that it will only update the model's definition but not any data loaded to the model nor any data source connections and credentials configured for the model. This way, metadata-only changes like adding or changing measures don't require waiting for import models' data cache to upload or refresh. Changes that affect loaded data such as M partitions or calculated objects do need a refresh. For those, the te refresh command reloads or recalculates the data.
Remember that Eugene and Ruben need to update the semantic model in the workspace so it contains both their changes. Ruben has to play by the rules again; he commits the change that's still only on his laptop and tries to push. Git refuses because he lacks Eugene's commit. After pulling and merging the changes, the main branch on his laptop has both changes. To deploy the main branch with both changes to the workspace, they add the Deploy stage:
Ruben had not committed his changes before publishing, so the model in the workspace doesn't have a matching commit. This is a problem because, as in part 1, Git's history only helps if you can match it to the live model. Because no commit matches the workspace model, Eugene and Ruben can't tell which changes it contains or which change caused a number in the report to change.
Thankfully, the pipeline knows which pushed commit to the main branch kicked it off, and writing that commit ID into the model as an annotation (a named value you can store in the model) lets anyone check the workspace to see which commit is deployed.
By adding the step Record source commit before deployment and letting it use te set to write this run's commit ($(Build.SourceVersion)) as a value to the SourceCommit annotation, they can match up the live model to the exact Git commit.
Eugene and Ruben can now match the workspace model to a commit, but they haven't added a deployment step for the report yet. The report also has to reach the workspace. If they continue publishing it from Power BI Desktop, they will replace the model (the .pbip contains both the report and the model) and undo what the pipeline deployed. In the repository, the report points to the model folder next to it, so they need to add the step Connect report to workspace model, which uses pbir report rebind to point it at the model in the workspace. Finally, they add the step Publish report to workspace, which uses pbir publish -f to overwrite the report. The report gets the same commit ID as the model: before it is connected, the step Record source commit in report uses pbir add annotation to write the ID into the report as a SourceCommit annotation.
NOTE
New models published to an empty workspace need their data source credentials configured before the first refresh. With XMLA deployment you can't set this credential. A person can take over in the model's settings and set it, or the service principal can set it through the Power BI REST API as owner. Credentials configured for published models aren't disturbed by deploys.
They update the model definition with te deploy (keeping the loaded data), but some features of the report stop working until the model is recalculated. The metric pickers used in the report are field parameters, and a metadata-only deploy leaves these calculated tables empty, so visuals using them would show errors. We thus need to add the step Recalculate model after the deploy to run te refresh --type calculate, which recalculates the tables from the data already in the model, without reloading from the data sources. The Deploy stage's steps Deploy model to workspace and Recalculate model use the service principal's identity. Azure DevOps passes plain variables from a variable group to every step as environment variables with the same names. A pipeline step needs to be given secrets such as AZURE_CLIENT_SECRET (from the variable group) through an env: block, so both steps using the TE CLI need such a block.
  - stage: Deploy
    dependsOn: Validate
    variables:
      - group: fabric-deploy
    jobs:
      - job: Model
        displayName: Deploy model
        pool:
          vmImage: ubuntu-24.04
        steps:
          - checkout: self

          - script: |
              tar -xzf ./tools/te/te-*-linux-x64.tar.gz -C ./tools/te
              echo "##vso[task.prependpath]$(Build.SourcesDirectory)/tools/te"
            displayName: Set up Tabular Editor CLI

          - script: te set . -p "Annotations[SourceCommit]=$(Build.SourceVersion)" --model "Invoiced Sales.SemanticModel" --save
            displayName: Record source commit

          - script: te deploy --model "Invoiced Sales.SemanticModel" --target-server "Order to Cash" --target-database "Invoiced Sales" --auth env --execute --force --ci azure-devops
            displayName: Deploy model to workspace
            env:
              AZURE_CLIENT_SECRET: $(AZURE_CLIENT_SECRET)

          - script: te refresh --type calculate -s "Order to Cash" -d "Invoiced Sales" --auth env --execute --force --no-progress
            displayName: Recalculate model
            env:
              AZURE_CLIENT_SECRET: $(AZURE_CLIENT_SECRET)

      - job: Report
        displayName: Deploy report
        dependsOn: Model
        pool:
          vmImage: windows-2025
        steps:
          - checkout: self

          - task: UsePythonVersion@0
            inputs:
              versionSpec: "3.12"

          - script: pip install pbir-cli==0.9.32
            displayName: Set up pbir-cli

          - script: pbir add annotation "Invoiced Sales.Report" --name SourceCommit --value $(Build.SourceVersion)
            displayName: Record source commit in report

          - script: pbir report rebind "Invoiced Sales.Report" "Order to Cash.Workspace/Invoiced Sales.SemanticModel"
            displayName: Connect report to workspace model
            env:
              FAB_TENANT_ID: $(AZURE_TENANT_ID)
              FAB_SPN_CLIENT_ID: $(AZURE_CLIENT_ID)
              FAB_SPN_CLIENT_SECRET: $(AZURE_CLIENT_SECRET)

          - script: pbir publish "Invoiced Sales.Report" "Order to Cash.Workspace/Invoiced Sales.Report" -f
            displayName: Publish report to workspace
            env:
              FAB_TENANT_ID: $(AZURE_TENANT_ID)
              FAB_SPN_CLIENT_ID: $(AZURE_CLIENT_ID)
              FAB_SPN_CLIENT_SECRET: $(AZURE_CLIENT_SECRET)
The dependsOn: Validate line makes the Deploy stage wait for the checks to complete, and the line dependsOn: Model lets the Report job wait for the Model job. Each job spins up a fresh machine and sets up tools as in part 2.
NOTE
To use this pipeline yourself, copy the full pipeline file from the sample repository and replace the workspace, model and report names with the ones you use. The pbir-cli needs the .Workspace, .SemanticModel and .Report endings to tell which kind of item it's handling; keep those.
The pipeline in action
Finally, we can see the thing in action. Ruben pushes his merge to main, which kicks off the pipeline. The first time a pipeline uses the variable group, the run waits until someone who manages the group clicks Permit in Azure DevOps. In later runs, the pipeline will just re-use the variable group instead of waiting for a click.
In this widget, you can follow along with this pipeline, from the pushed commit that kicks it off to the workspace deploys:
The pipeline runs on every push to main
- 3b07f1c
- e41d9a2
- next commit
-
Validate model
- Validate model
- Best Practice Analyzer
-
Validate report
- Validate report
-
Deploy model
- Record source commit
- Deploy model to workspace
- Recalculate model
-
Deploy report
- Record source commit in report
- Connect report to workspace model
- Publish report to workspace
-
Semantic model
Old version Source commit: none Not deployed by the pipeline yet -
Report
Old version Source commit: none Not deployed by the pipeline yet
Which version is live?
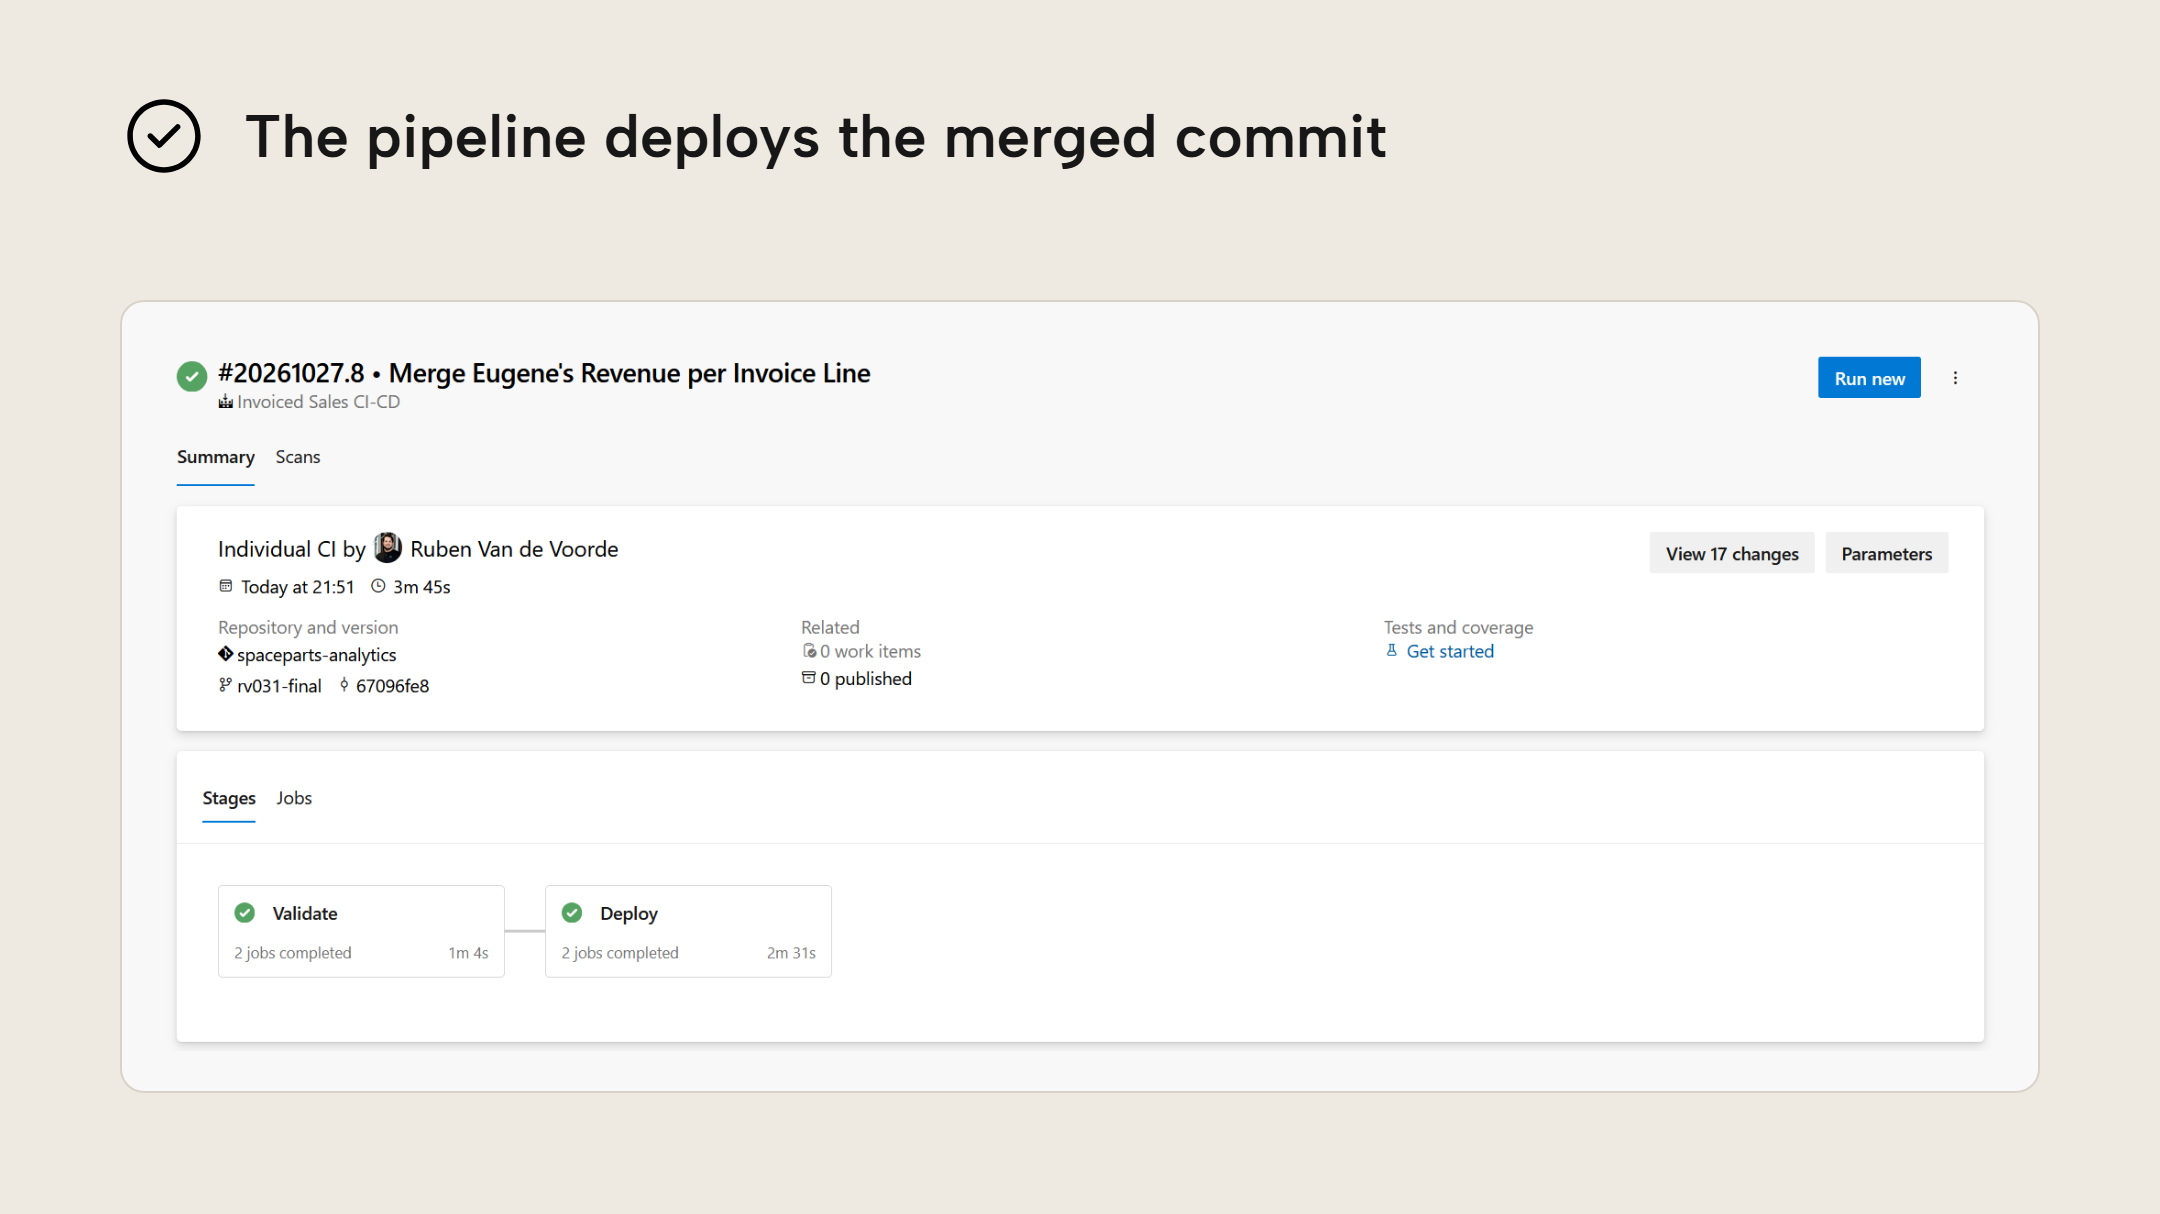
Eugene would like to know whether the pipeline worked and his change is now back in the workspace. With te query, he runs the DAX function INFO.ANNOTATIONS() against the workspace model to read the SourceCommit annotation that the Record source commit step writes.
te query -s "Order to Cash" -d "Invoiced Sales" -q 'EVALUATE FILTER(INFO.ANNOTATIONS(), [Name] = "SourceCommit")'

Using cached credentials
╭─DAX Query────────────────────────────────────────────────╮
│ EVALUATE                                                 │
│ FILTER ( INFO.ANNOTATIONS ( ), [Name] = "SourceCommit" ) │
╰──────────────────────────────────────────────────────────╯
Validating query...
Executing query...

  [ID]  │ [ObjectID] │ [ObjectType] │ [Name]       │ [Value]                                  │ [ModifiedTime]
 ───────┼────────────┼──────────────┼──────────────┼──────────────────────────────────────────┼─────────────────────
  12076 │ 1          │ 1            │ SourceCommit │ 67096fe81967590959575a198c36201e38ec2313 │ 27/10/2026 20:53:25

1 row(s) in 138ms
NOTE
If your shell is the command prompt, you'll need double quotes: -q "EVALUATE FILTER(INFO.ANNOTATIONS(), [Name] = ""SourceCommit"")". In Windows PowerShell 5.1, you'll need a backslash before the inner quotes: -q 'EVALUATE FILTER(INFO.ANNOTATIONS(), [Name] = \"SourceCommit\")'.
This is the ID of Ruben's last pushed commit, and since Eugene's commit comes before it on main, both changes made it in. Reports can't receive DAX queries, but the pbir-cli can list annotations added to reports by downloading them:
pbir download "Order to Cash.Workspace/Invoiced Sales.Report" -o live
cd live
pbir annotations list "Invoiced Sales.Report"

                 Annotations in Invoiced Sales.Report
  Name            Value                                       Level
  SourceCommit    67096fe81967590959575a198c36201e38ec2313    Report

Total: 1 annotation(s)
The report annotation has the same commit ID as the model, i.e. the report in the workspace is the one that the checks validated against this model. As long as only the pipeline deploys to the workspace, these IDs tell you which commit is live. If either comes back empty, someone published that item from Power BI Desktop, because the pipeline is the only one that writes the annotation.
So Eugene and Ruben agree that from now on, only the pipeline deploys to the workspace from pushes to the main branch. They both remain contributors to the workspace, so nothing stops either from throwing a wrench in the works by publishing from Power BI Desktop again. CI/CD is not just about having the right tools; it is mostly about behavior and following the agreed-upon practices. Even the best-designed CI/CD process falls apart when developers stop playing by its rules.
TIP
We could add a scheduled pipeline to flag workspace models and reports whose SourceCommit annotation is missing or contains a value different from the latest commit on main, but we don't build or test that process in this series. You can use pipelines for many such supporting processes.
Wrapping up the story, here is where Eugene and Ruben were at the start of this blog, and where they are now:
Further Reading
- CI/CD Integration (Tabular Editor Documentation). This guide covers using the TE CLI in pipelines, with further guidance for the deployment steps used here.
- Semantic model connectivity and management with the XMLA endpoint in Power BI (Microsoft Learn). This reference covers XMLA connectivity and permissions relevant to deploying and querying the semantic model.
- Set secret variables (Microsoft Learn). This guide explains secret variables and why a secret needs an explicit
env:mapping for each step that uses it.
Conclusion
In this third part of the blog series, we added a Deploy stage to the pipeline that in part 2 only performed checks but moved nothing. Now, the pipeline moves the changes from the main branch of the Git repository -- the one we set up in part 1 -- to the Fabric workspace. A service principal authenticates so deploying is no longer contingent on people's availability, and the pipeline tags deployed models and reports with commits so it's always clear which version is live. However, these changes still go straight to Production. Every push to main reaches the workspace users consume from, and the checks only run after the push. In part 4, we add peer review in the form of pull requests (PRs) and key user review in the form of workspaces to separate development from UAT (user acceptance testing) from production. Finally, part 5 adds automated regression tests to catch incorrect numbers.
The five parts of Deploy it right take you through source control, validation, deployment, environments and regression tests for semantic models.
- Source control for semantic models: You save the model as PBIP with TMDL, push it to Git, and use commit history to find which change moved a number.
- Validate every model change: Your pipeline runs
te validateand Best Practice Analyzer for the model andpbir validatefor the report on every push tomain. - Publish with a pipeline, this article: Your pipeline deploys the checked model and report to the workspace as a service principal and records the deployed commit in both.
- Branching and environments, not published yet: Your changes reach
mainthrough approved pull requests, and your pipeline deploys to Dev, Test and Prod, with approval required before Prod. - Regression tests for semantic models, not published yet: Tests compare DAX results from the deployed model with expected values in the repository, and failures stop the pipeline before Test or Prod.
Take your semantic models further with Tabular Editor.
Give Tabular Editor a spin